
2 More Basics
Now that you are familiar with basic pitches and rhythm, we will learn about accidentals, beat divisions, and other clefs.
HALF STEPS AND WHOLE STEPS 2.1
The smallest distance between keys on a keyboard is called a half step. Because of the asymmetrical pattern of white keys and black keys on a keyboard (there are 52 white keys and only 36 black keys), half steps can be between a white and black key or between two white keys. We use a caret (^) to show half steps.
Example 2.1.1. Half steps on the keyboard

- Example 2.1.1A: Half steps can occur between a white key and a black key.
- Example 2.1.1B: Half steps can occur between two white keys only when there is no black key in between. This only occurs between two pairs of notes:
- E and F
- B and C
- It is extremely helpful to remember that these are the two white-key half steps.
- Example 2.1.1C: Half steps can occur between a black key and a white key.
Two half steps make a whole step. Whole steps can occur between various combinations of white keys and black keys. We use a square bracket to show whole steps.
Example 2.1.2. Whole steps on the keyboard

- Example 2.1.2A: Whole steps can occur between a white key and a black key when there is a white key in between.
- Example 2.1.2B: Whole steps can occur between a black key and a white key when there is a white key in between.
- Example 2.1.2C: Whole steps can occur between two black keys when there is only one white key in between.
- Example 2.1.2D: Whole steps can occur between two white keys when there is a black key in between.
Half Steps
Because the piano keyboard is not symmetrical, half steps occur between two white keys: between B and C, and between E and F.
Practice 2.1
Directions:
- Label the given steps on the keyboard below.
- For answers on white keys, write your answer on the key itself.
- For answers on black keys, write your answer above the key.
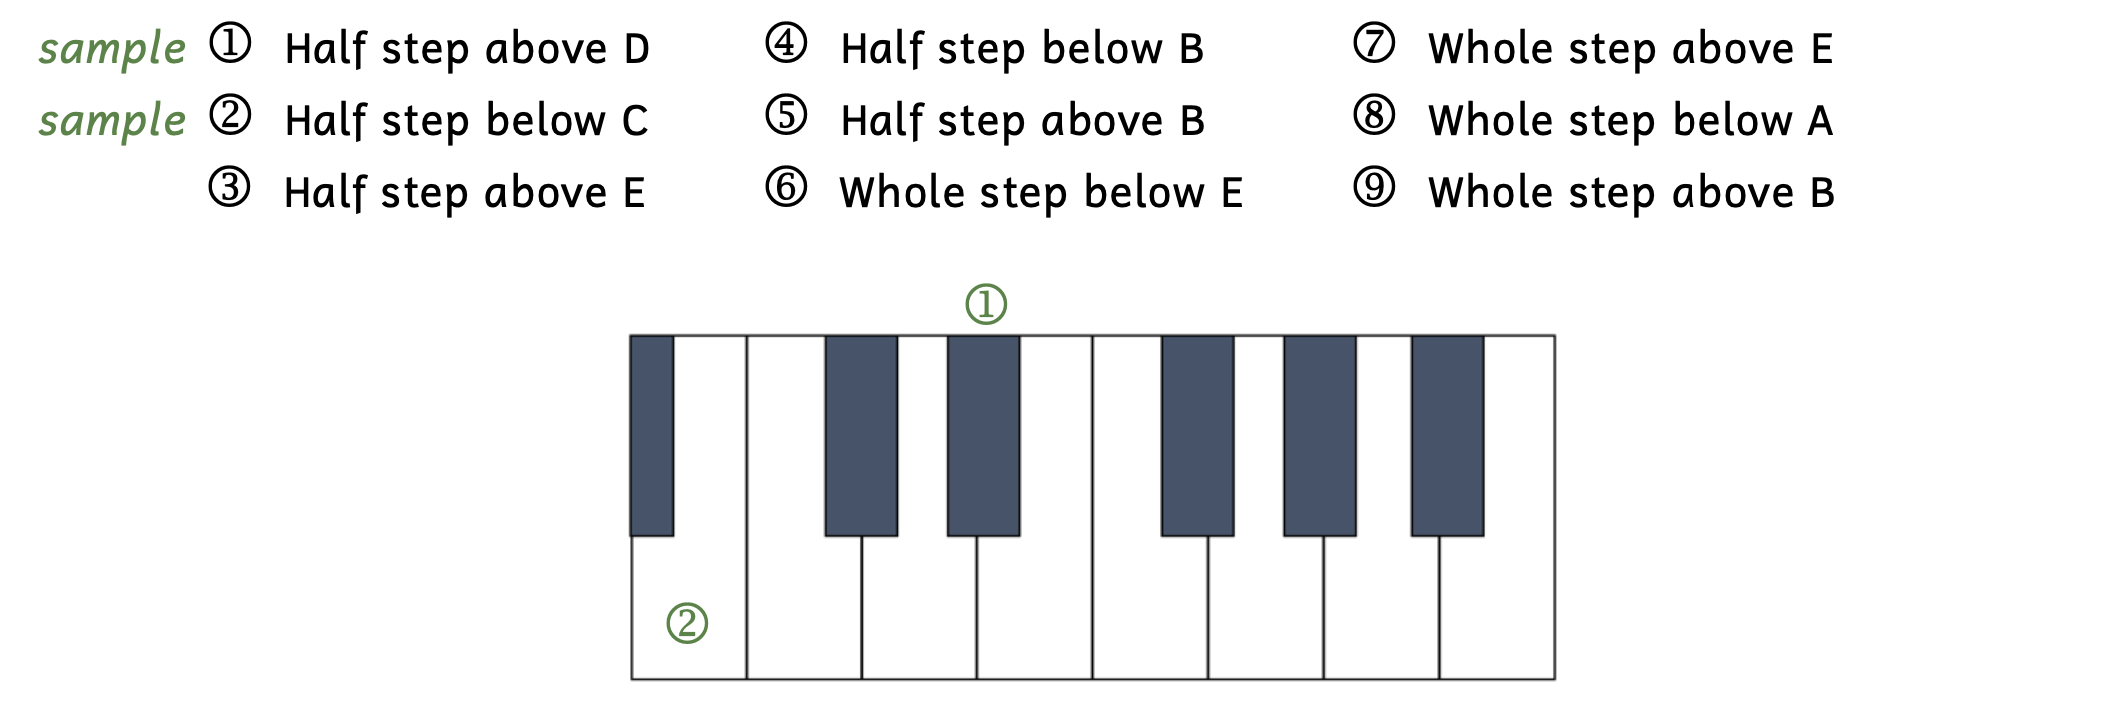
Click here to watch the tutorial.
ACCIDENTALS 2.2
At this point, we have only learned the note names of the white keys on the piano keyboard. The black keys share the same note names, but require an additional musical symbol called an accidental. Accidentals must be used to name black keys on the keyboard, but may also be used to name white keys. There are five different types of accidentals.
Example 2.2.1. Accidentals
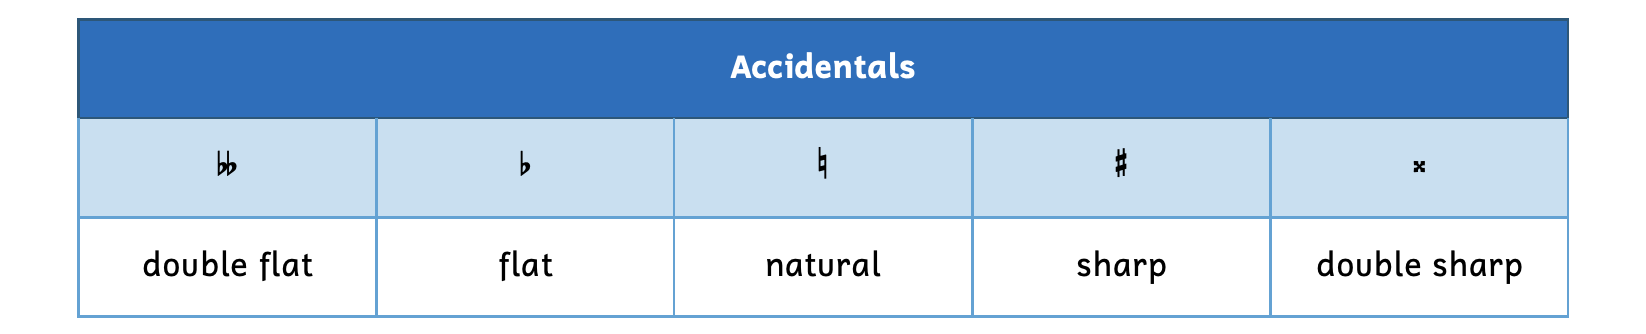
- A double flat indicates that the note is a whole step lower than the white key.
- A flat indicates that the note is a half step lower than the white key.
- A natural sign indicates that the previous accidental no longer applies and returns back to the white key.
- A sharp indicates that the note is a half step higher than the white key.
- A double sharp indicates that the note is a whole step higher than the white key.
We will begin by applying all these accidentals (except the natural sign) to the note D. We will get to the natural sign later.
Example 2.2.2. Accidentals on D

- D-double-flat is a whole step below D.
- D-flat is a half step below D.
- D-sharp is a half step above D.
- D-double-sharp is a whole step above D.
We defined a sharp as an accidental that raises a note a half step from its white key. Many students mistakenly assume that the sharp simply raises a note a half step. However, what if we want to raise D-double-flat a half step? We could not write D-sharp—that would raise the note three half steps! Raising D-double-flat a half step would actually result in D-flat while D-sharp is a half step above the white key, D.
Just as dot placement was important, the correct placement of accidentals is also important. In Example 2.2.2, D is on the third line of the staff. Notice how the third line of the staff also runs through the center of each accidental. There are a number of common mistakes students make when writing accidentals.
- When speaking or writing with words, the accidental goes after the note name (e.g., “D-flat”). However, when writing music, the accidental appears before the notehead. Students often draw the accidental after the notehead, but that is incorrect.
- Be sure the accidental is large enough. Many students write tiny accidentals.
- Be sure the accidental is not too large. For example, if the center of the accidental covers a space and line, we cannot be sure which note should have the accidental.
- Be sure to place the accidental correctly before the notehead. Writing the accidental above or below the notehead (too high or too low) is incorrect.
Let’s apply all five accidentals to the note E, which is a little trickier due to its placement on the keyboard.
Example 2.2.3. Accidentals on E

Notice that unlike D-sharp, which was on a black key, E-sharp is on a white key. This is because of the asymmetrical pattern of white keys and black keys on the keyboard: a half step above E is another white key. Many students assume sharps and flats can only be black keys, but that is not the case.
Composers use accidentals all the time. Example 2.2.4 illustrates several accidentals in practice.
Example 2.2.4. Accidentals: Candeille[1], “L’Enfant Fidèle,” Theme de Tarare
Example 2.2.4 includes both flats and sharps. Later in this chapter you will learn when to use flats, when to use sharps, and when to rewrite accidentals.
Assuming Accidentals
Do not assume that sharps and flats always refer to black keys on the keyboard. Always keep in mind the two white-key half steps: between B and C, and between E and F.
Practice 2.2A
Directions:
- Write the following pitches on the staff using half notes. Be aware that the clef changes.

Click here to watch the tutorial.
Practice 2.2B
Directions:
- Fill in the blank with an accidental to raise or lower the given note by a half step or whole step.
- Then label the pitch on the keyboard below.
- For answers on white keys, write your answer on the key itself.
- For answers on black keys, write your answer above the key.
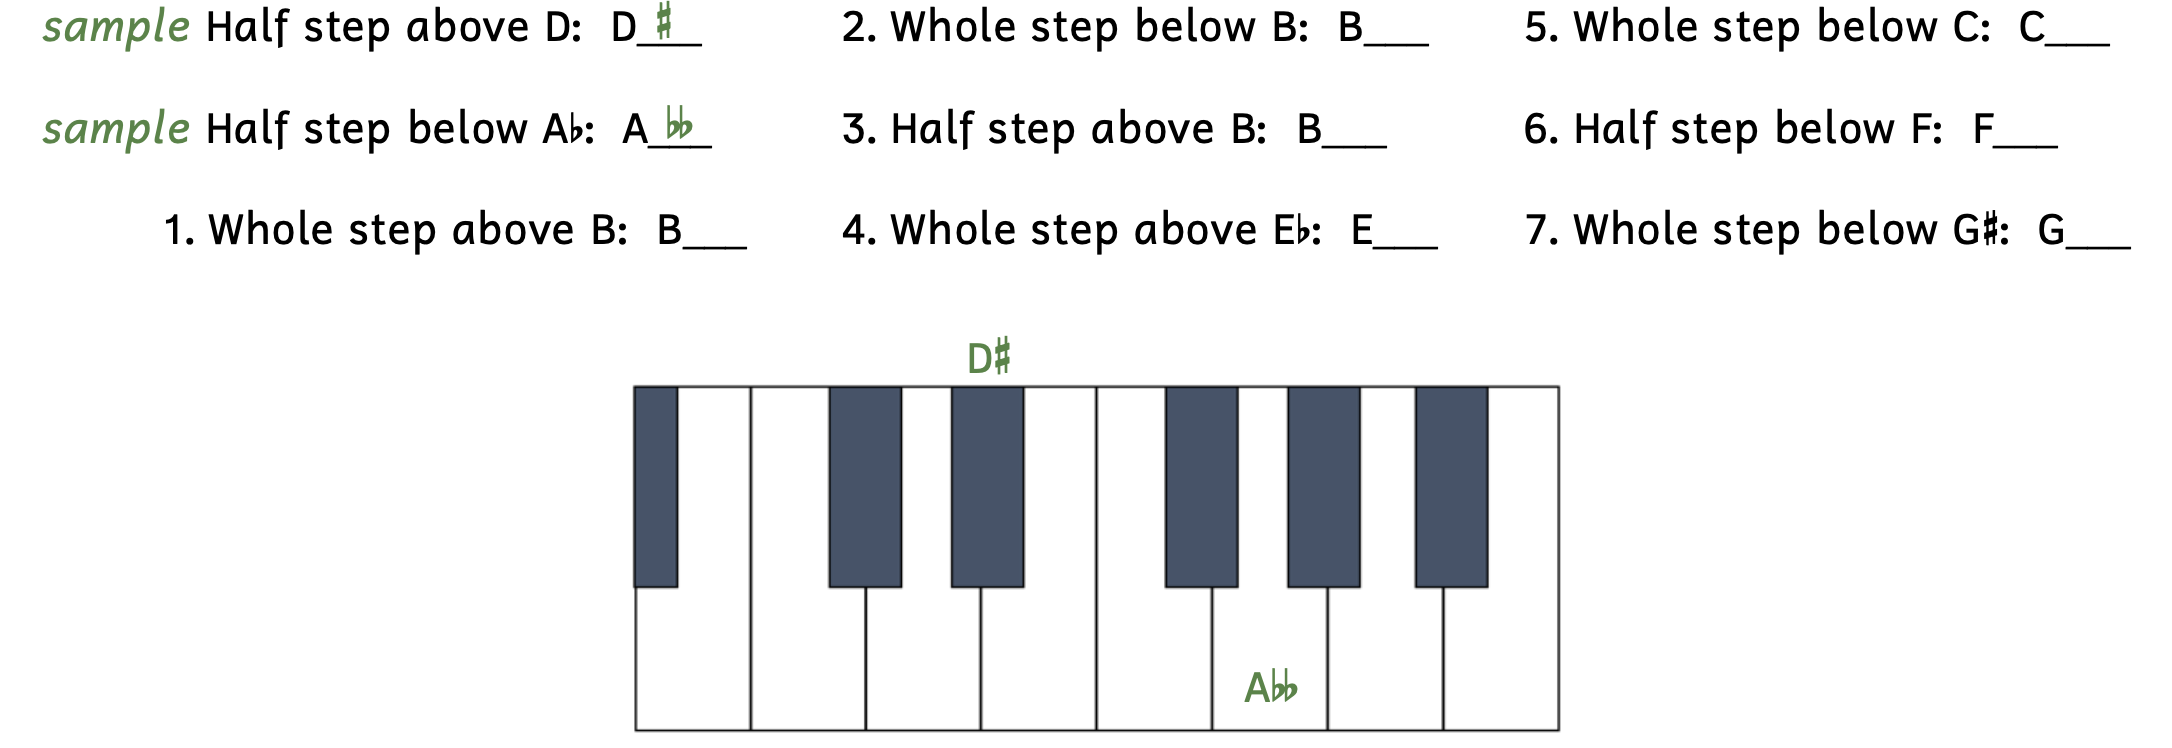
Click here to watch the tutorial.
Solution
Natural Sign
As you recall, a natural sign indicates that a previous accidental no longer applies and the note returns back to the white key. If there was no accidental to begin with, we have no need for a natural sign. Accidentals continue throughout the measure, so a natural sign is required when you want to return to the white key.
Example 2.2.5. Natural Sign

- The first pitch is E.
- It does not require an accidental. Without an accidental, it is assumed to be E, the white key on the keyboard.
- The second pitch is E-flat.
- The accidental is required.
- The third pitch is also E-flat, not E.
- Do not rewrite the flat because the accidental continues to this note.
- The last pitch is E-natural (or E).
- On the staff, the natural sign is required. If the natural sign were not there, the note would be another E-flat.
Accidentals have very specific requirements and do not last long.
- Accidentals are localized: an accidental only applies to a note in that exact octave designation.
- An accidental does not continue after a bar line.
Example 2.2.6. Application of accidentals
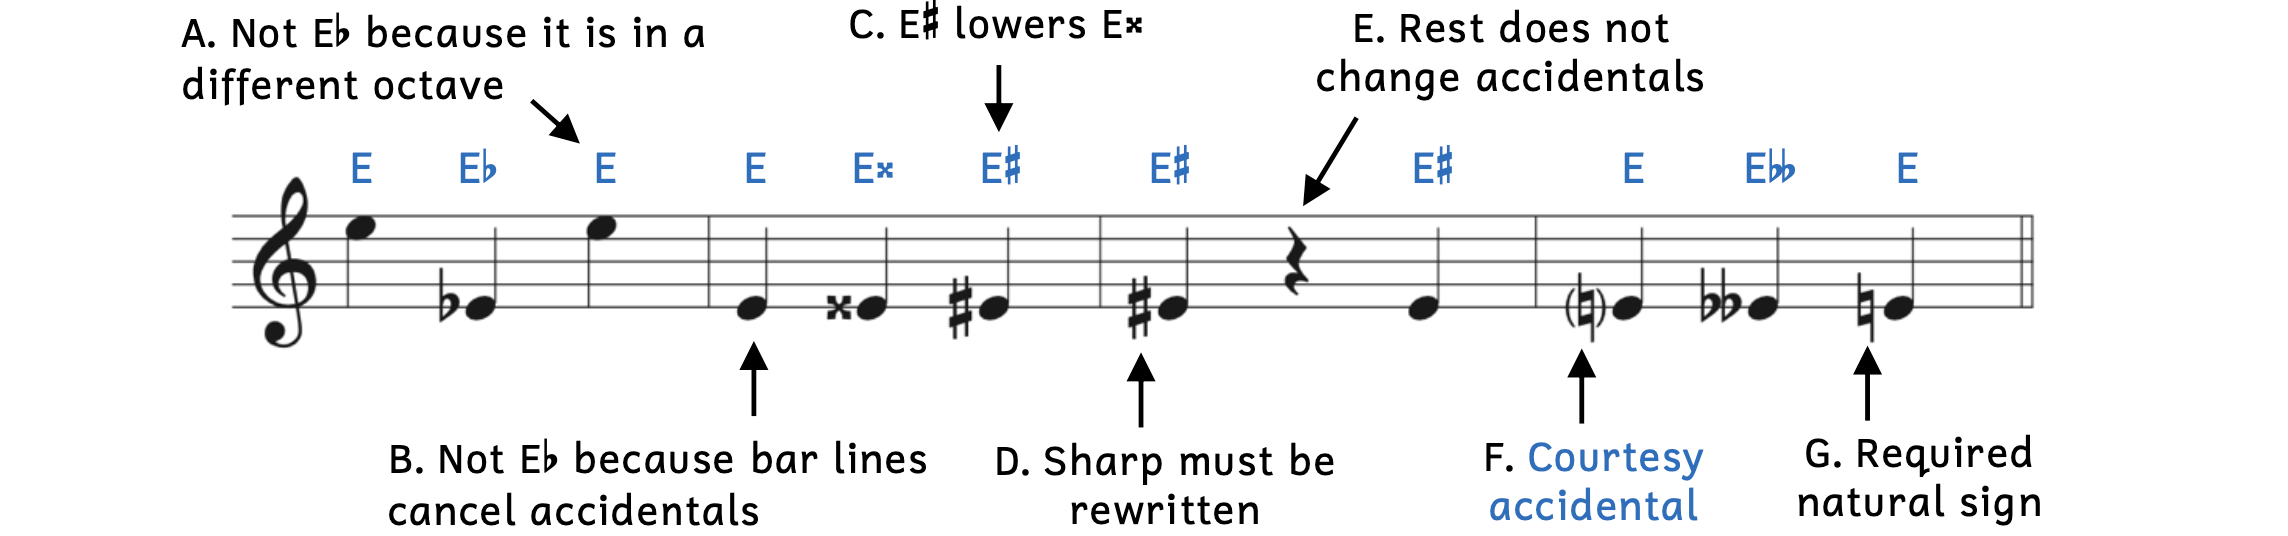
- Example 2.2.6A: This pitch is E and not E-flat because the Es are in different octaves.
- Although the previous note was E-flat, the flat only applied to E-flat4. Since the third note belongs to a different octave designation (E5), the flat does not apply.
- Example 2.2.6B: The pitch is E and not E-flat due to the bar line.
- Although this E is also E4, the bar line cancels all accidentals from the previous measure.
- Example 2.2.6C: The pitch is E-sharp.
- The sharp raises a note a half step from its white key on the keyboard. Here, the sharp is actually lowering E-double-sharp because E-sharp is a half step below E-double-sharp. However, it is still a half step above E so it is called E-sharp.
- Sometimes students will try to lower a note by adding a flat, but as you can see, this is not always the case.
- Example 2.2.6D: The pitch is E-sharp.
- Because of the bar line, the sharp must be rewritten. If not, the note would be E.
- Example 2.2.6E: Rests do not affect accidentals.
- The note after the rest is still E-sharp since the rest makes no difference.
- Example 2.2.6F: The parentheses around the accidental make the natural a courtesy accidental (or cautionary accidental). Courtesy accidentals are used when the accidental is not necessary, but may be helpful to the musician.
- Since there were so many accidentals before this point, the performer may get confused. The courtesy accidental confirms that the note is natural.
- Parentheses are not required for courtesy accidentals.
- A courtesy natural could have also been used at Example 2.2.5B.
- Example 2.2.6G: The pitch is E.
- Here, the natural sign is required and should not have parentheses around it.
Example 2.2.7 shows the opening four bars of “Hawaiian Rainbows,” which includes numerous accidentals. The pitches are labeled above the music.
Example 2.2.7. “Hawaiian Rainbows”

Notice a few things about the accidentals:
- At the end of the first measure, the pitch is still E-flat, even though the flat is not rewritten and there is a note in between.
- The first note in the second measure does require a flat since it is in a different octave and is after a bar line.
- The only natural sign occurs on B because the previous note is the same letter name in the same octave.
Example 2.2.8 contains both a required natural sign and a courtesy natural sign.
Example 2.2.8. More accidentals: Candeille, “Romance de L’Orpheline de Berlin”
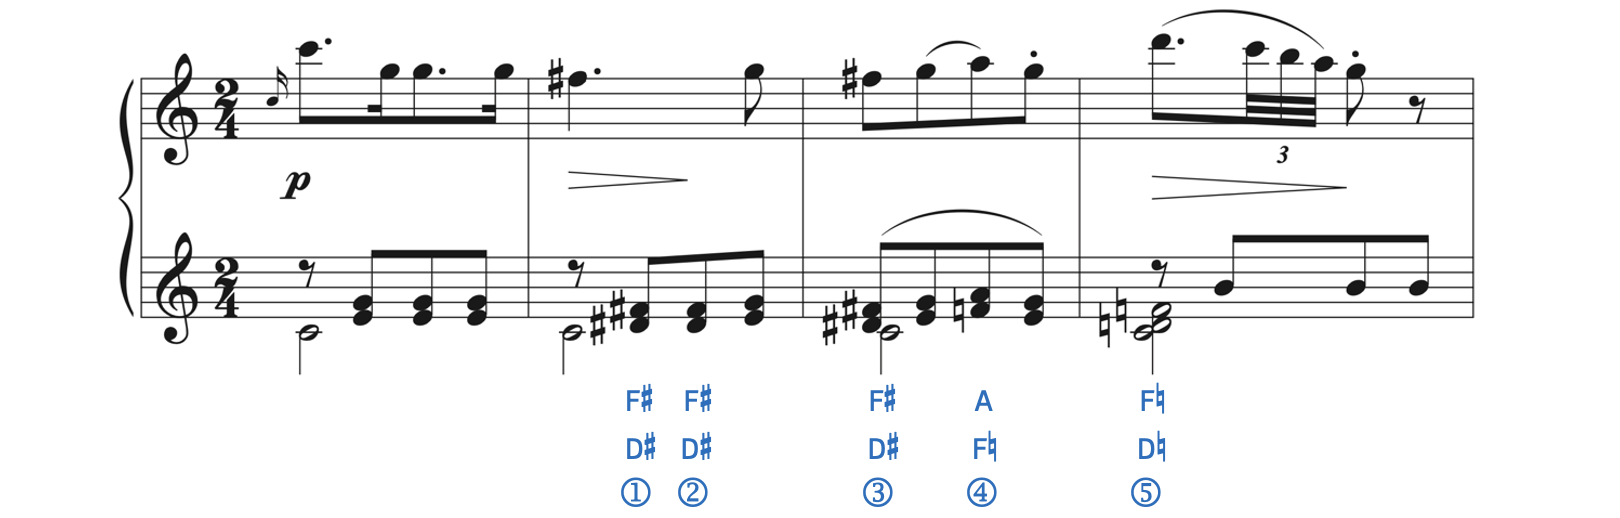
- First, be aware that although the music is written for grand staff, the bottom staff has a treble clef.
- Number 1: Both D and F have a sharp, so the pitches are D-sharp and F-sharp.
- Number 2: Although D and F do not have a sharp directly in front of them, the accidentals continue.
- Number 3: Because of the bar line, both D and F require sharps to be rewritten. Otherwise, the pitches would be D-natural and F-natural.
- Number 4: This time, Candeille wants an F-natural. The natural sign is required.
- Number 5: The courtesy natural signs show that both D and F are natural.
- There are no parentheses around these courtesy accidentals.
- Although courtesy accidentals are not required, it confirms that the pitches are indeed D and F, and not D-sharp and F-sharp.
Accidentals
• The different types of accidentals are the double flat, flat, natural, sharp, and double sharp.
• When speaking or writing with words, the accidental goes after the note name (e.g., “F-sharp”). However, when writing music, the accidental appears before the notehead.
• Accidentals are localized, meaning that they only occur to that specific octave designation.
• After a bar line, all accidentals no longer apply.
• You must use a natural sign to return back to the white key after an accidental.
• After a bar line, you do not need to add a natural sign, but may choose to use a courtesy accidental.
Practice 2.2C
Directions:
- Identify the pitches on the staff.
- Circle the note(s) that should have a courtesy accidental.

Click here to watch the tutorial.
Solution
Practice 2.2D
Directions:
- Write the pitches on the staff using quarter notes. Be sure to use accidentals when necessary and to avoid them when unnecessary.

Click here to watch the tutorial.
ENHARMONIC EQUIVALENTS 2.3
In Example 2.2.3, what appeared to be an F on the keyboard was called E-sharp. This is because F and E-sharp are enharmonically equivalent. Two notes are enharmonic equivalents when they are the same key on the keyboard (or sound the same), but have different note names (i.e., are spelled differently).
Example 2.3.1. Enharmonic equivalents
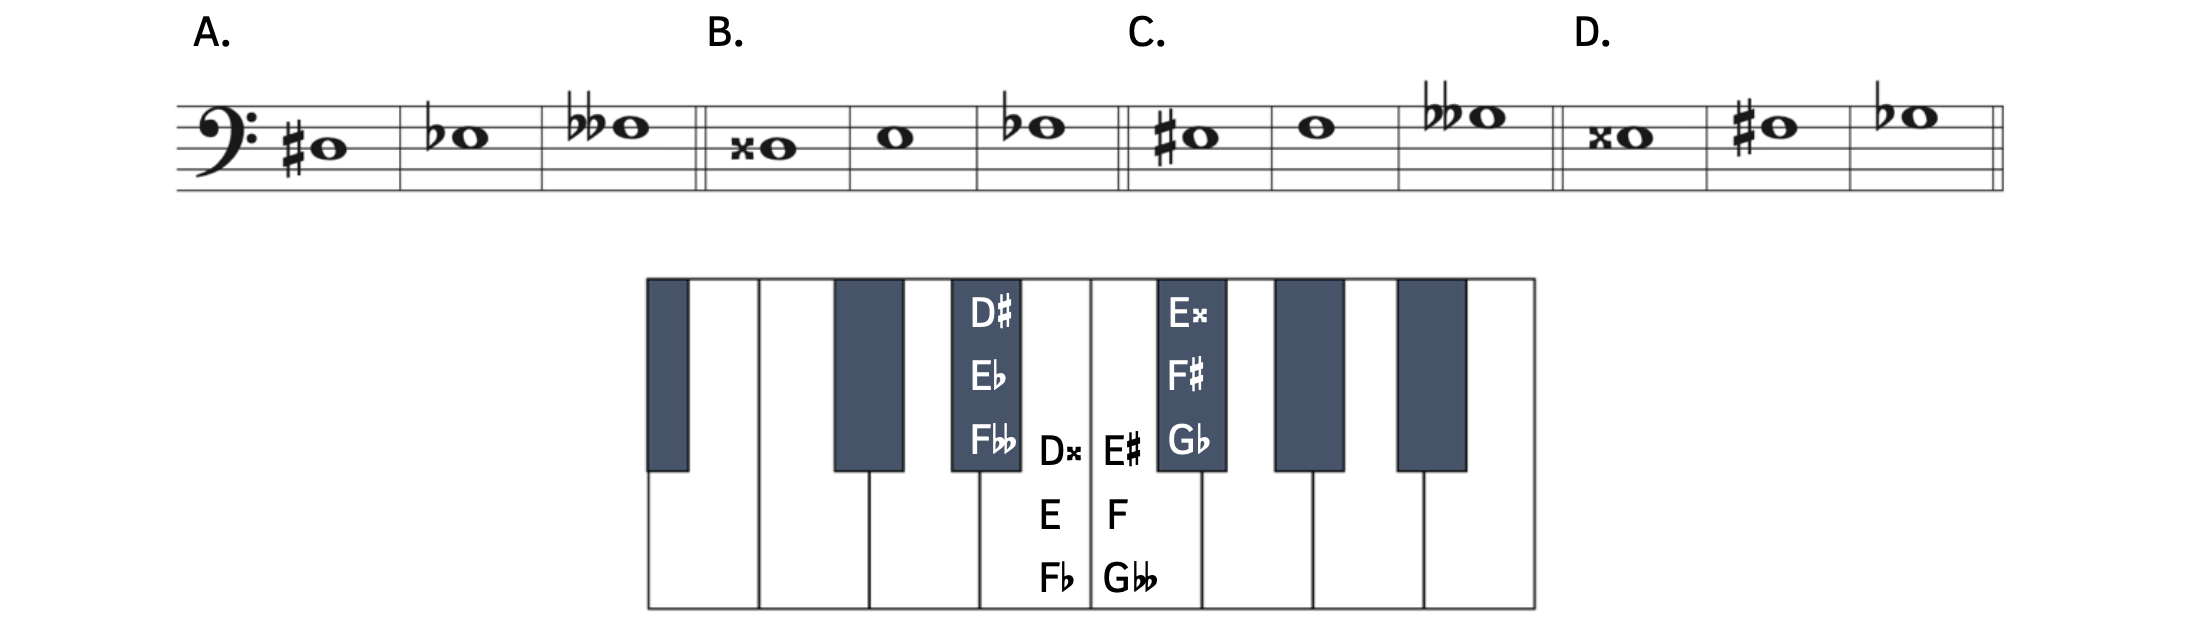
- Example 2.3.1A: D-sharp, E-flat and F-double-flat are enharmonically equivalent because they are the same key on the keyboard, but have different note names and are spelled differently on the staff
- Example 2.3.1B: D-double-sharp, E, and F-flat are enharmonically equivalent.
- Example 2.3.1C: E-sharp, F, and G-double-flat are enharmonically equivalent.
- Example 2.3.1D: E-double-sharp, F-sharp, and G-flat are enharmonically equivalent.
You may wonder why anyone would ever use G-double-flat instead of F, as in Example 2.3.1C. However, as you will later learn, based on context, sometimes G-double-flat will be the correct note and F will not be. For example, compare the words “I” and “eye.” They sound the same and “I” is much easier to spell. However, if you write “He poked his I,” that would be incorrect. Just as in grammar, context will be the deciding factor.
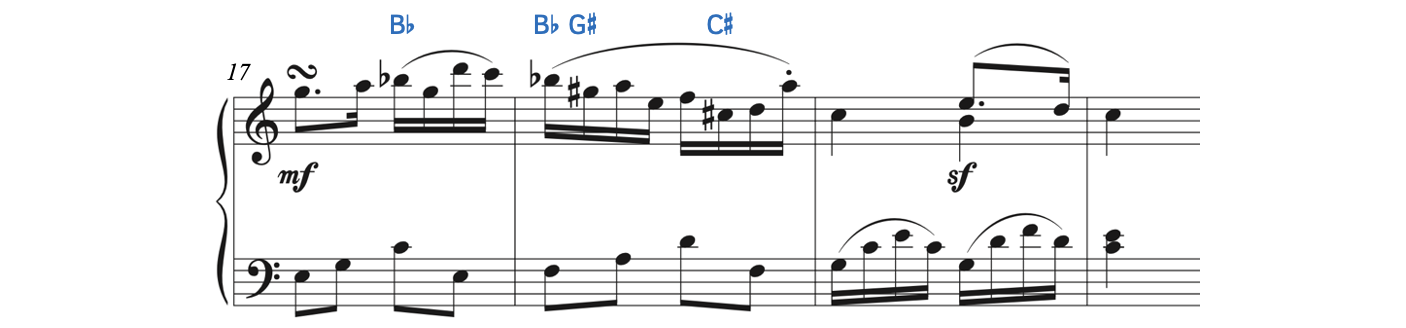
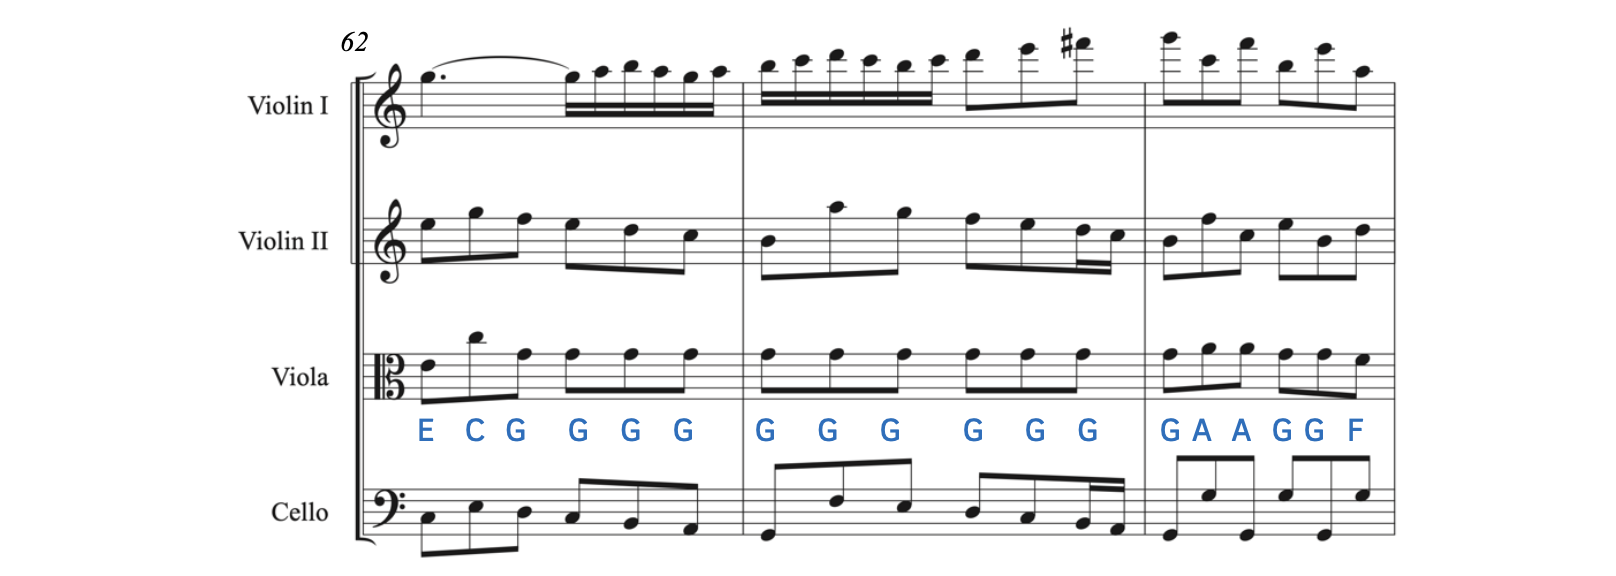
There are two enharmonic equivalents next to each other in Example 2.3.2.
Example 2.3.2. Enharmonic equivalents: Le Beau[2], Piano Sonata, Op. 8, i –Allegro ma non troppo
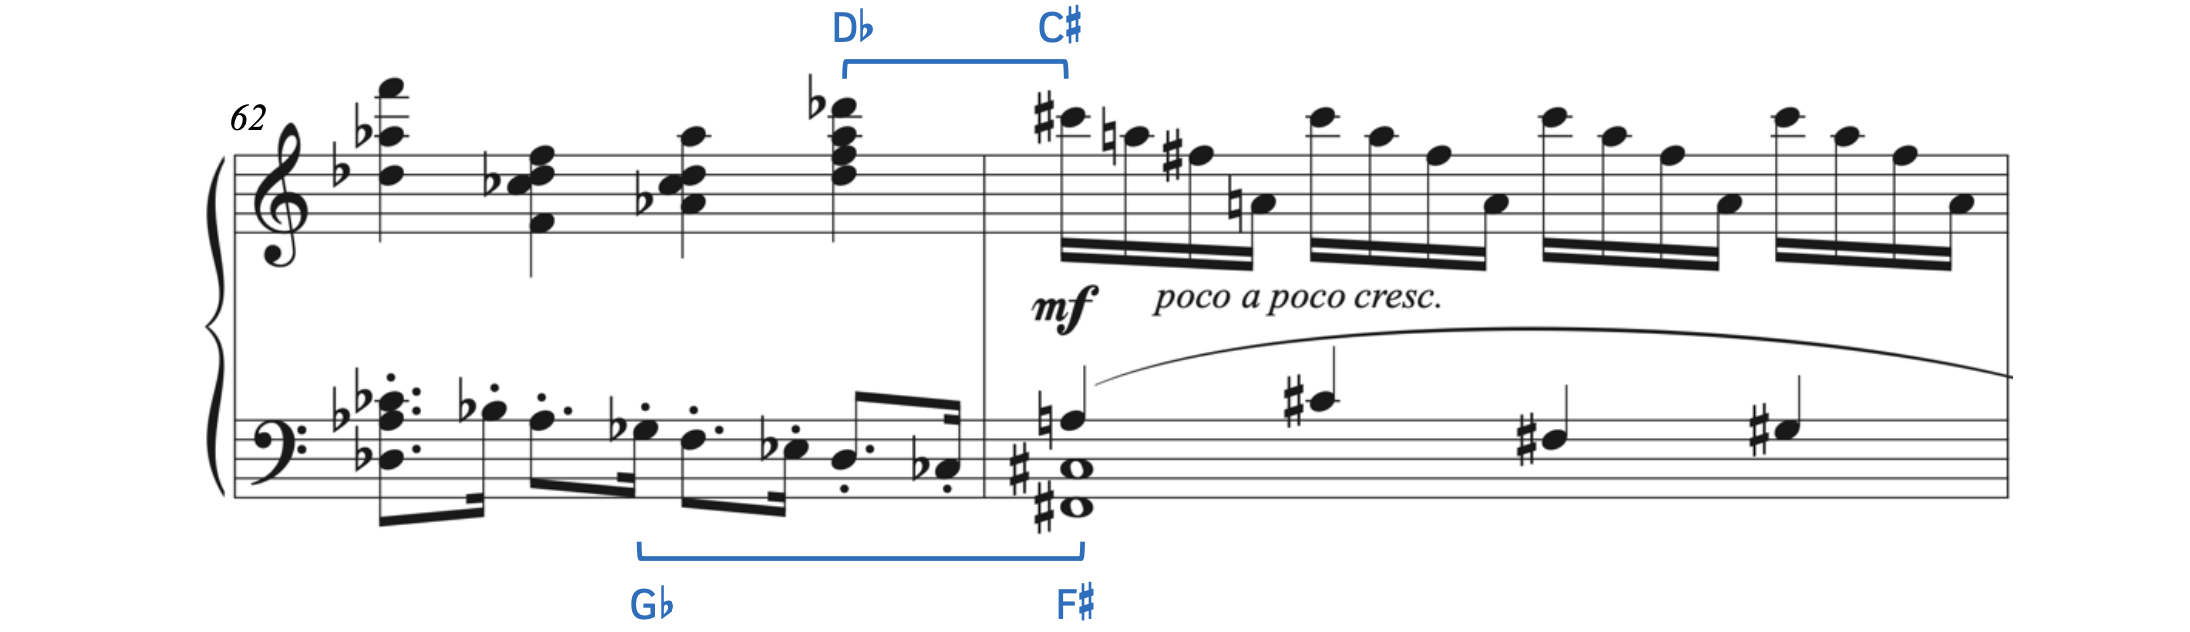
- Notice that measure 62 is full of flats, while measure 63 has only sharps and natural signs.
- Across the bar line in the treble clef, D-flat moves to its enharmonic equivalent, C-sharp. Since the music is moving from flats to sharps, writing the note as C-sharp is more appropriate.
- In the bass clef, what was previously G-flat now becomes F-sharp. Again, this occurs because the music moves from flats to sharps.
Le Beau takes enharmonic equivalents even further in Example 2.3.3, which comes from a piano quartet. A piano quartet consists of four instruments: violin, viola, cello, and piano. The viola often reads in another clef called the alto clef, which we will learn about in Section 2.8. For now, know that the top note in the viola is a B-flat.
Example 2.3.3. Simultaneous enharmonic equivalents: Le Beau, Piano Quartet, Op. 28, iv – Finale. Allegro.

At the same moment, Le Beau writes several notes as enharmonic equivalents.
- As the viola holds out B-flat (remember that the viola usually reads in alto clef), the piano has multiple A-sharps.
- The cello plays C-sharp at the same time as the piano plays D-flat.
Although it may be confusing why a composer would want to use enharmonic equivalents, there is always a reason (which you will learn about much later). Generally, composers do not randomly switch from one note to its enharmonic equivalent or use two enharmonic equivalents at the same time. In both Examples 2.3.2 and 2.3.3, Le Beau has reasons for spelling pitches enharmonically.
Two notes are enharmonically equivalent when they are the same key on the keyboard or sound the same, but have different note names.
Practice 2.3
Directions:
- Write two different enharmonic equivalents for the given pitches.
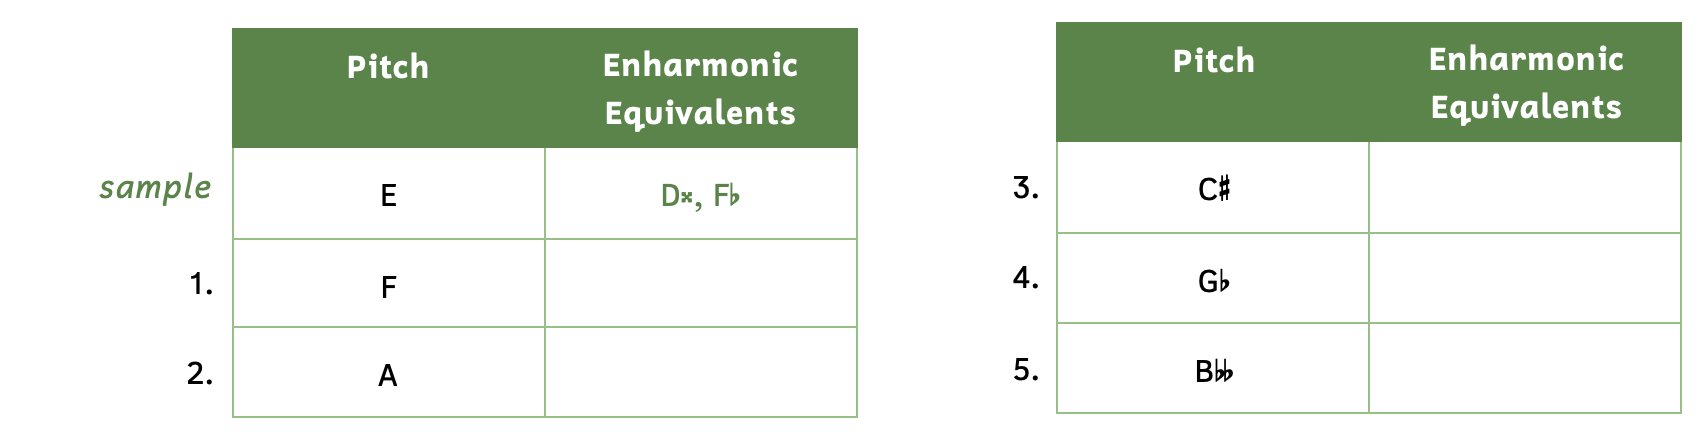
Click here to watch the tutorial.
Solution
2) G-double sharp, B-double flat
3) B-double sharp, D-flat
4) F-sharp, E-double sharp
5) A, G-double sharp
CHROMATIC V. DIATONIC HALF STEPS 2.4
We learned that D-sharp and E-flat are enharmonically equivalent. This means that both D-sharp and E-flat are a half step below E. In order to know which one to use, we distinguish between chromatic half steps or diatonic half steps.
Example 2.4.1. Chromatic v. diatonic half steps

- Example 2.4.1A: Chromatic half steps have the same note name.
- E-flat is a chromatic half step below E because they both share the note name, E.
- Example 2.4.1B: Diatonic half steps have a different note name.
- D-sharp is a diatonic half step below E because they have different note names (E and D).
If we refer back to “Hawaiian Rainbows,” we see a variety of half steps. Square brackets indicate diatonic half steps, while carets represent chromatic half steps.
Example 2.4.2. Half steps in “Hawaiian Rainbows”

- Example 2.4.2A: There is a descending diatonic half step between A-flat and G.
- Example 2.4.2B: There is a descending chromatic half step between G and G-flat.
- Example 2.4.2C: There is a descending diatonic half step between G-flat and F.
- Example 2.4.2D: There is an ascending chromatic half step between B-flat and B-natural.
- Example 2.4.2E: There is an ascending diatonic half step between B-natural and C.
- Although B-natural and C are both white keys, remember that this is still a half step.
You can find chromatic and diatonic half steps everywhere, as in Example 2.4.3. Like Example 2.4.2, carets indicate chromatic half steps while square brackets represent diatonic half steps.
Example 2.4.3. Half steps: Szymanowska[3], Dance No. 2, Trio
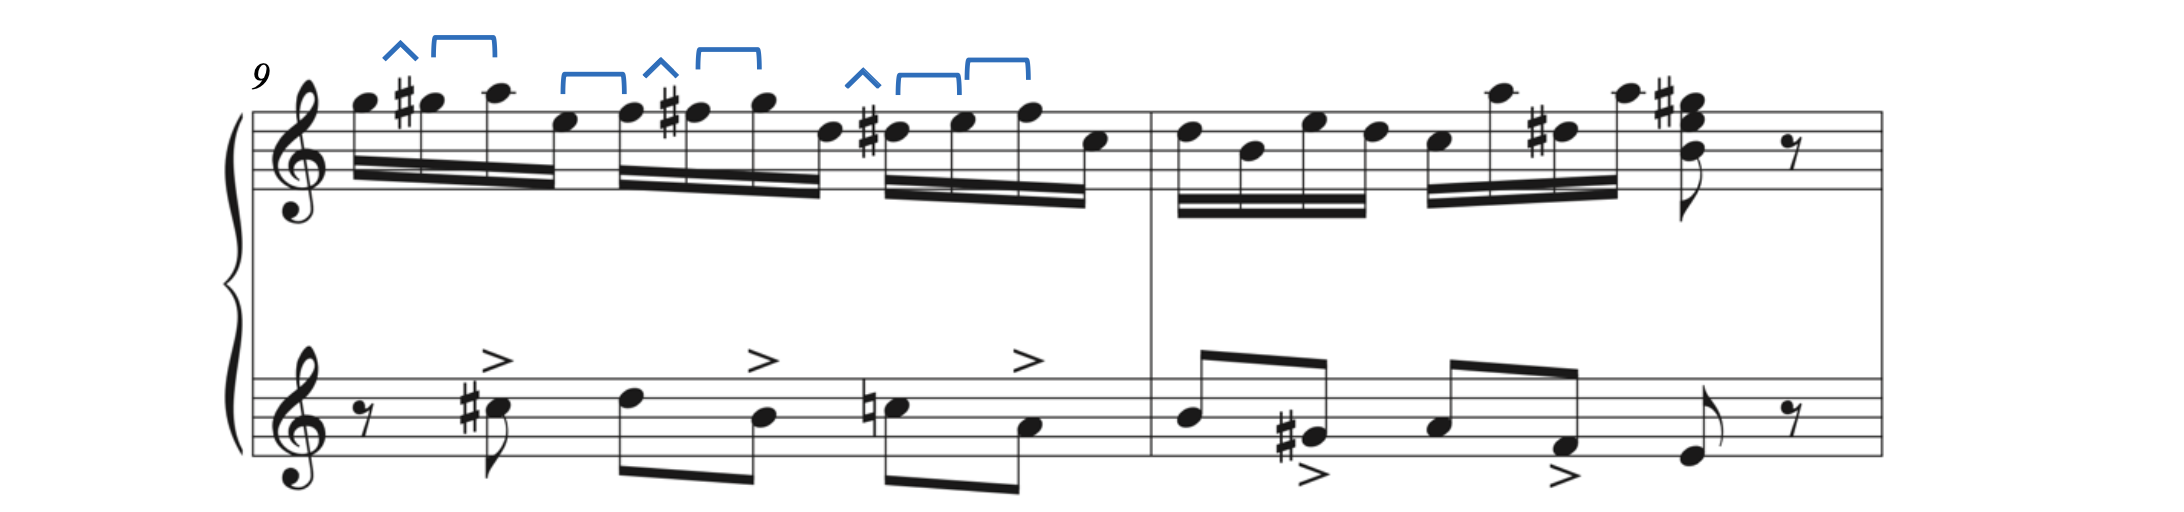
It would be impossible to write the half steps in measure 9 as only chromatic half steps or diatonic half steps without the need to use double sharps or double flats. It is important that you know how to identify and write both types of half steps.
Chromatic Versus Diatonic Half Steps
• Chromatic half steps refer to half steps with the same note name (e.g., E and E-sharp).
• Diatonic half steps refer to half steps with different note names (e.g., E and F).
Practice 2.4A
Directions:
- Fill in the table with the correct pitch names.
- You may use the keyboard below to help you.
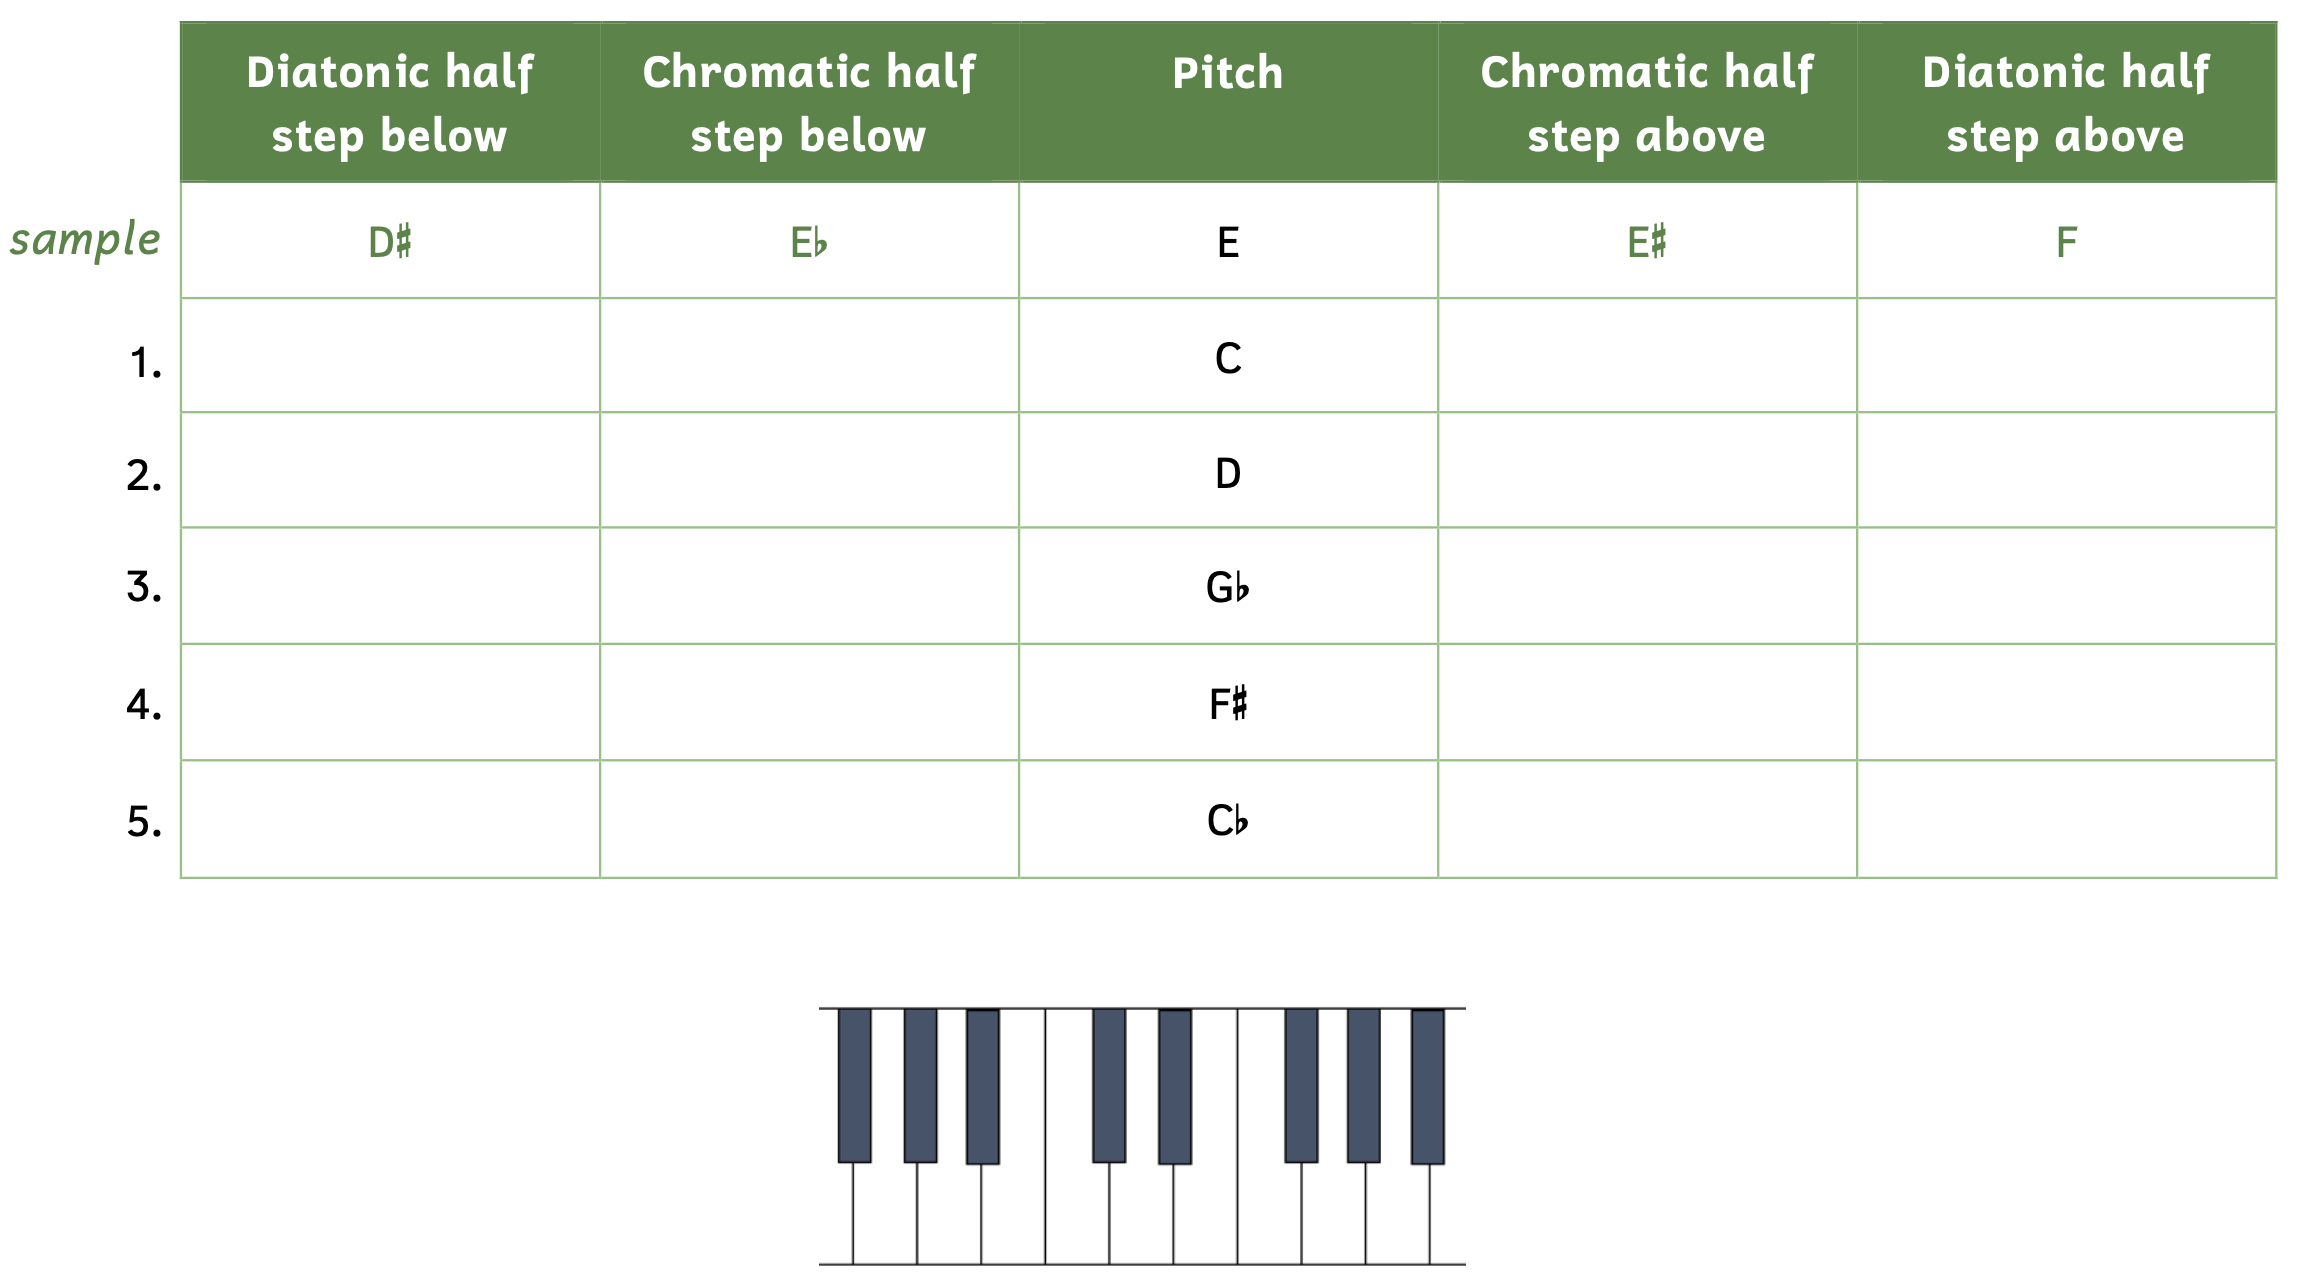
Click here to watch the tutorial.
Solution
2) C-sharp | D-flat | D-sharp | E-flat
3) F | G-double flat | G | A-double flat
4) E-sharp | F | F-double sharp | G
5) B-flat | C-double flat | C | D-double flat
Practice 2.4B
Directions:
- Identify all diatonic half steps with a square bracket.
Szymanowska, Sérénade for Cello and Piano

Click here to watch the tutorial.
CHROMATIC SCALE 2.5
A scale is a collection of pitches that ascends or descends in alphabetical order. The first and last notes of the scale are an octave apart. Since accidentals are localized, if the first note of the scale has an accidental, the last note of the scale must also have an accidental.
The chromatic scale is made entirely of half steps. This means it uses all twelve different keys on the piano. The chromatic scale is written differently depending on whether the scale ascends or descends. In general, while ascending, use sharps for black keys and while descending, use flats.
Example 2.5.1. Chromatic Scale

- Example 2.5.1A: While ascending, sharps are used for all the black keys except for B-flat, since the scale is the B-flat chromatic scale. Sharps represent ascending motion.
- Since the first note is B-flat3 and accidentals are localized, the last note (B-flat4) must also have an accidental.
- Example 2.5.1B: While descending, flats are used for all the black keys. Flats represent descending motion.
- Notice how enharmonic equivalents (such as G-sharp and A-flat) are spelled differently, based on if the chromatic scale is ascending or descending.
Example 2.5.2 illustrates a common mistake made by students when writing an ascending chromatic scale: the scale uses every letter in the musical alphabet followed by a sharp.
Example 2.5.2. Incorrect chromatic scale

Since there is no black key between E and F and between B and C, E-sharp is enharmonically equivalent to F and B-sharp is enharmonically equivalent to C. E should go directly to F and B should go directly to C; E-sharp and B-sharp (in red) are errors. Listen to Example 2.5.2–can you hear the two repeated notes?
When you write a chromatic scale, use sharps for the ascending chromatic scale and flats for the descending chromatic scale. However, when you see a chromatic scale within a real piece of music, the composer may choose to use a variety of sharps and flats. In Bizet’s “Habanera,” there are several inconsistencies. Ignore the unfamiliar rhythms in Example 2.5.3 for now and focus only on the pitches.
Example 2.5.3. Bizet[4], “L’amour est un oiseau rebelle,” Habanera from Carmen, Act I

- In the first measure, Bizet uses a C-sharp instead of D-flat when descending from D to C.
- Although the natural sign on the C is not necessary in the second measure, it is a courtesy accidental. This courtesy accidental does not have parentheses around it.
- The G-sharp in the middle of the example connects A to G (instead of A-flat).
- The natural after G-sharp is necessary.
Chromatic Scale
• Scales organize pitches in ascending or descending order from one note to the same note an octave away.
• The chromatic scale uses all twelve keys on the keyboard.
• When ascending, use sharps for chromatic half steps for the black keys.
• When descending, use flats for for chromatic half steps for the black keys.
Practice 2.5
Directions:
- For #1, write an ascending chromatic scale beginning on E2 using quarter notes.
- For #2, write a descending chromatic scale beginning on G-sharp5 using dotted half notes.
- For both scales, choose an appropriate clef and end with a double bar line.
Click here to watch the tutorial.
BEATS AND DIVISIONS 2.6
We learned that any note can equal one. This means that any note can equal the beat. The beat is the continuous and regular pulse you feel when you experience music—it is how you clap your hands or tap your foot while listening to music.
Although any of the note values can technically be worth one beat, the ones we usually come across are beats equaling one half note, one quarter note, or one eighth note.
Recall that the half note can be evenly divided into two quarter notes, the quarter note can be evenly divided into two eighth notes, and the eighth note can be evenly divided into two sixteenth notes. When a beat is evenly divided into two, this is called the beat division, or simply, division.
Example 2.6.1. Beats and divisions

If the beat is a note with a flag (e.g., an eighth note), we keep the flag. However, when two notes with flags form a beat division, we beam the flags together.
Example 2.6.2. Beaming
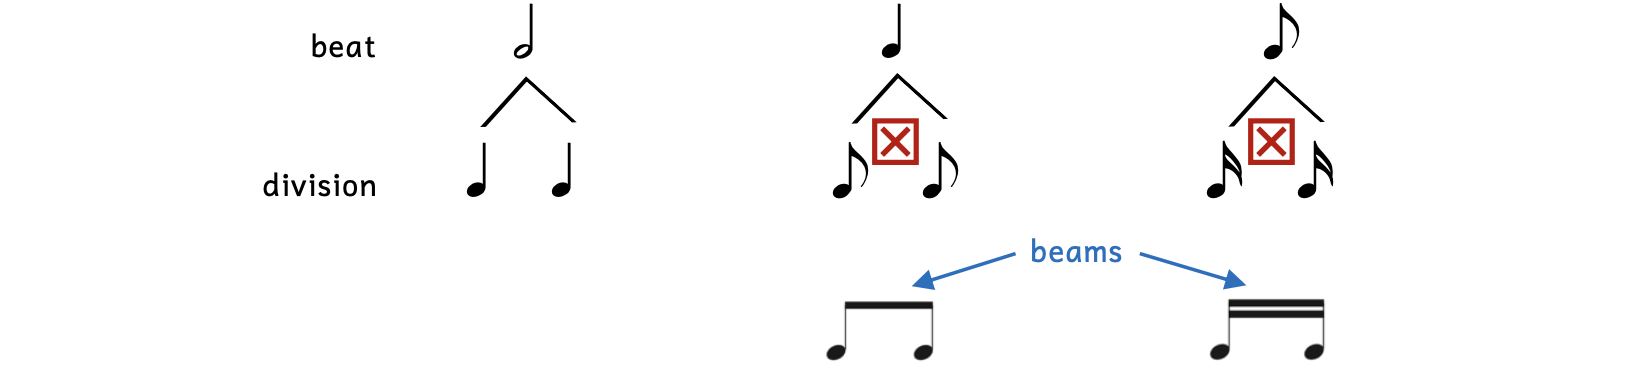
Since eighth notes have one flag, two eighth notes forming a beat have one beam. Sixteenth notes have two flags, so two sixteenth notes forming a beat have two beams. Beaming grouped notes is extremely helpful for musicians to quickly read music since beats are read as a unit. You can compare reading music to reading words: imagine reading one letter at a time as opposed to one word at a time.
Each note of the division can also be divided in two, called the subdivision (beat subdivision).
Example 2.6.3. Subdivision
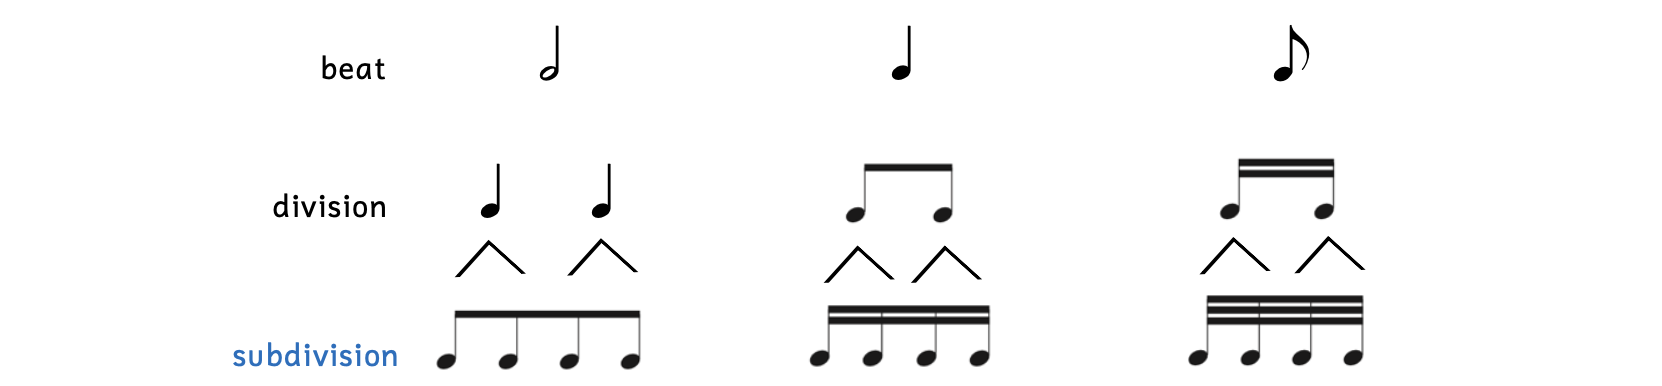
Notice that bisecting each note of the division results in a subdivision containing four notes. Because these notes all have flags, they are beamed together. Compare this to the eighth note beat: since it is a single note, it is not beamed and retains its flag.
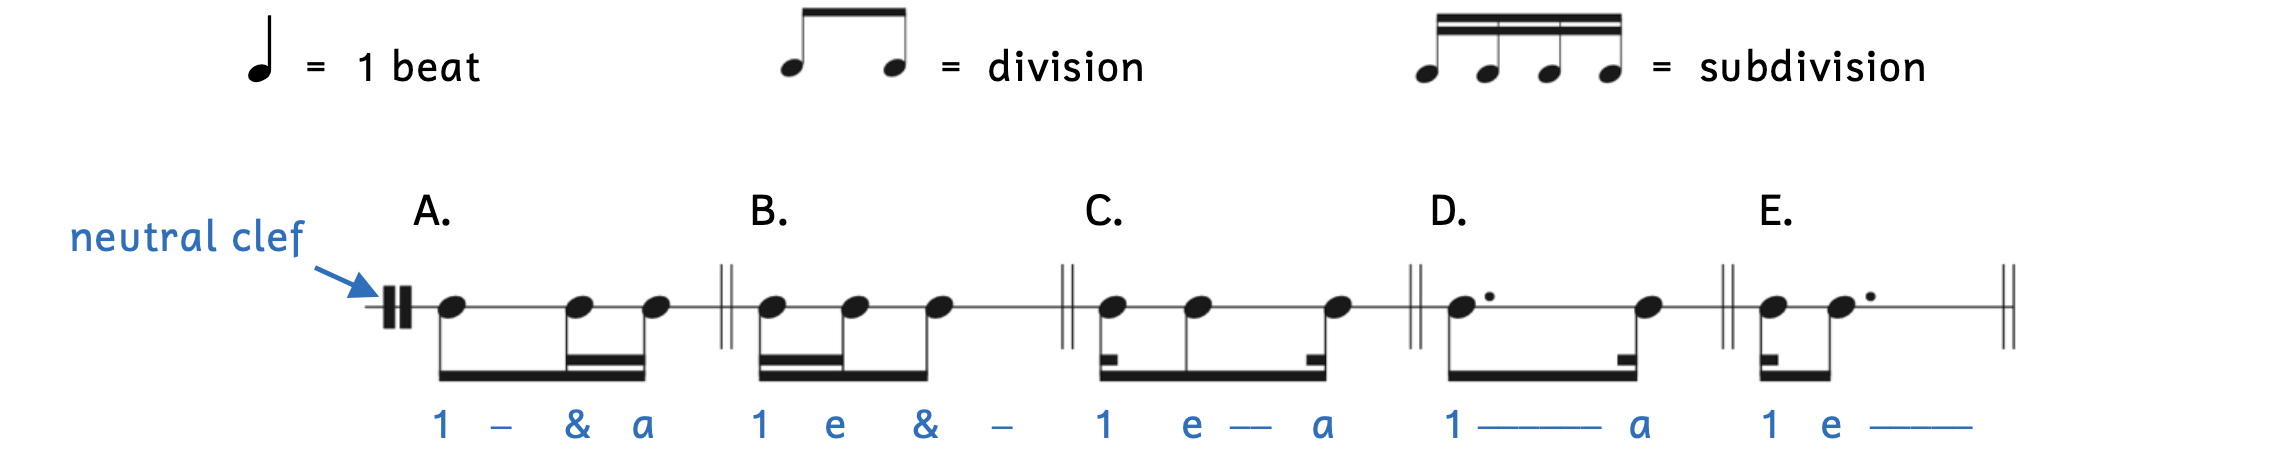
We use rhythm syllables to help us understand and perform rhythms. Rhythm syllables use numbers or syllables for every sounded note. Styles of rhythm syllables vary, but for this book we will be using the rhythm number system.
Example 2.6.4. Rhythm number system

- For now, we say “1” whenever there is a note that is worth one beat, or when a note falls on the first part of the beat. (Later, we will use other numbers.)
- When a note falls where the division occurs, we say “&” (“and”).
- When a note falls on the second subdivision, we say “e” (pronounced “ee”).
- When a note falls on the fourth subdivision, we say “a” (pronounced “uh”).
Notice how all the 1s are aligned, and how the &s are aligned in the division and subdivision. When writing music, it is important to show music as it sounds in time: longer notes have more space after them, while shorter notes have less space after them.
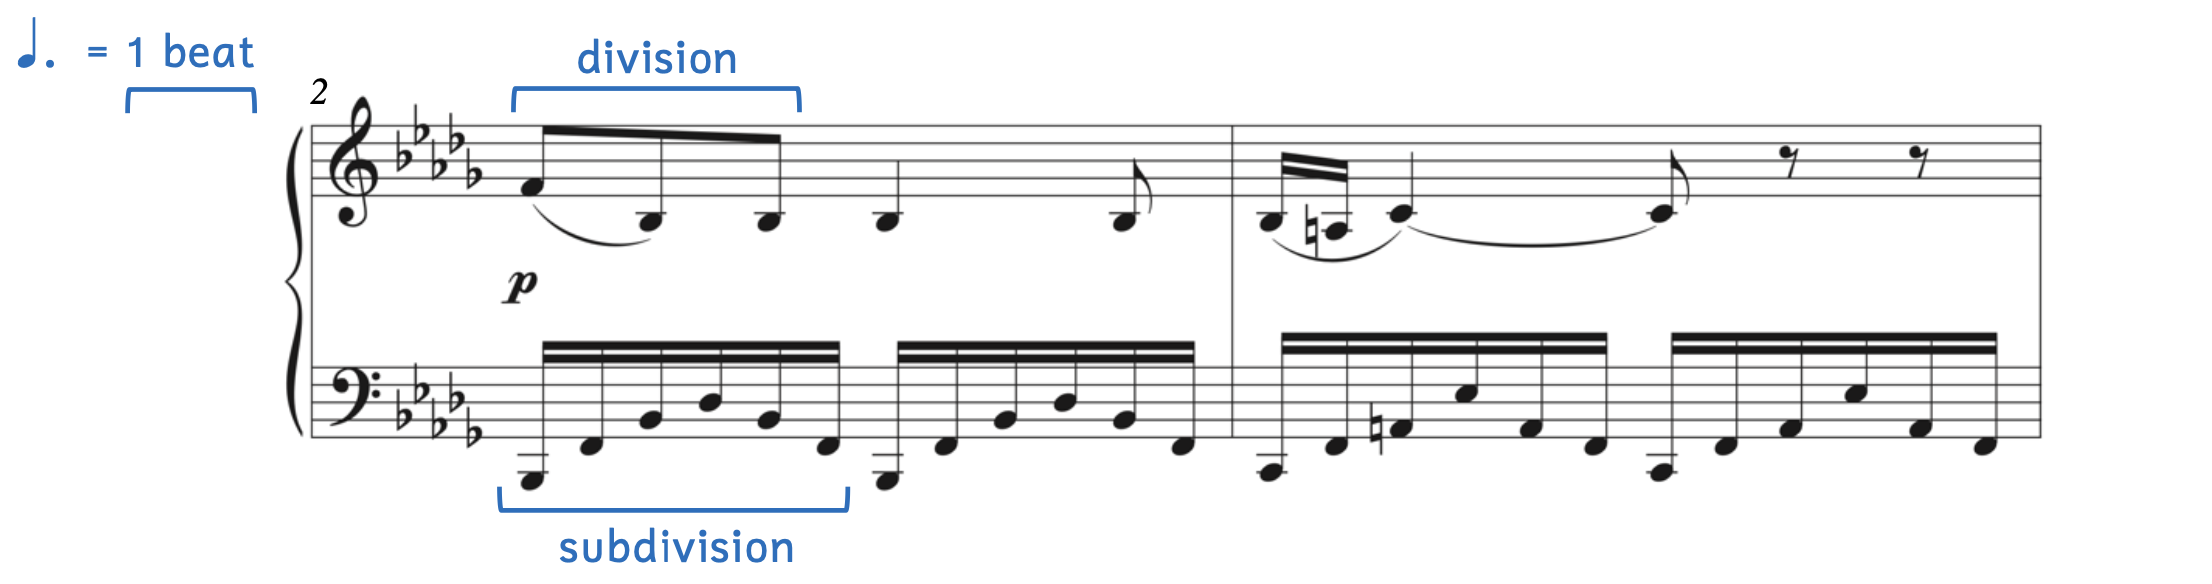
Example 2.6.5 illustrates the division and subdivision of the beat.
Example 2.6.5. Fučik[5], Einzug der Gladiatoren[6]
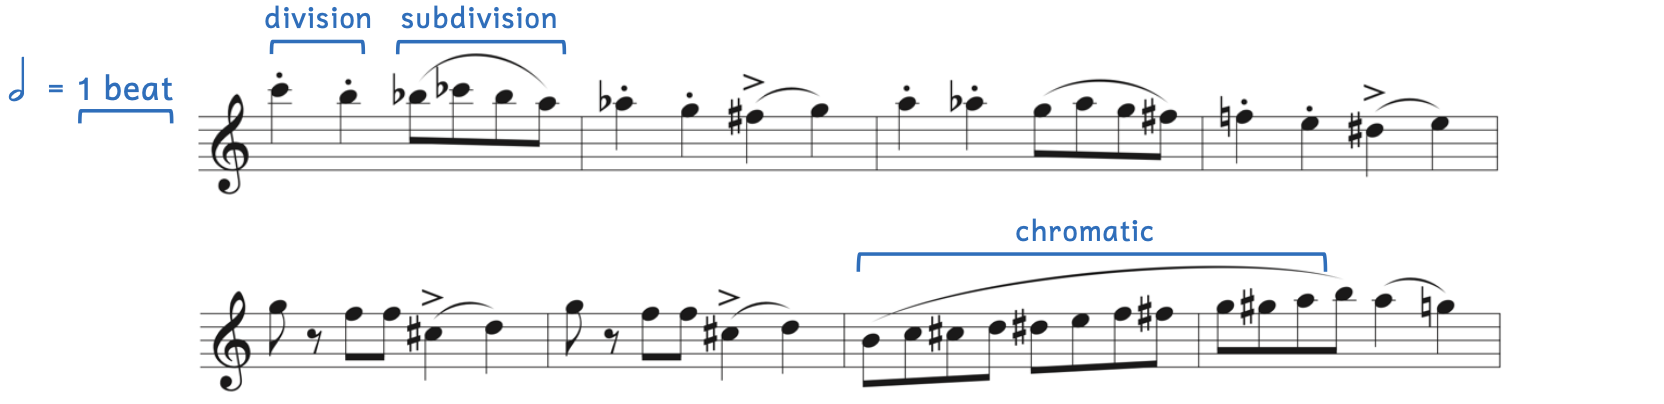
- Because a half note receives the beat, the division is two quarter notes and the subdivision is four eighth notes.
- There are no beams for the division of quarter notes because quarter notes do not have flags.
- Since eighth notes have one flag, one beam connects the four eighth notes to equal one beat.
- This example includes three articulation marks we learned in the previous chapter: staccato, slur, and accent.
- Fučik uses nearly the entire chromatic scale from B4 to B5 at the end of the example. However, A-sharp is missing near the top. Notice how Fučik uses sharps as the chromatic scale ascends.
Beats, Divisions, and Subdivisions
• Any note value can be equal to one beat, but the half note, quarter note, and eighth note are the most common.
• Beats can be evenly bisected into two, creating a division.
• Divisions can be evenly bisected into two, creating a subdivision. Therefore, beats can be equally subdivided into four.
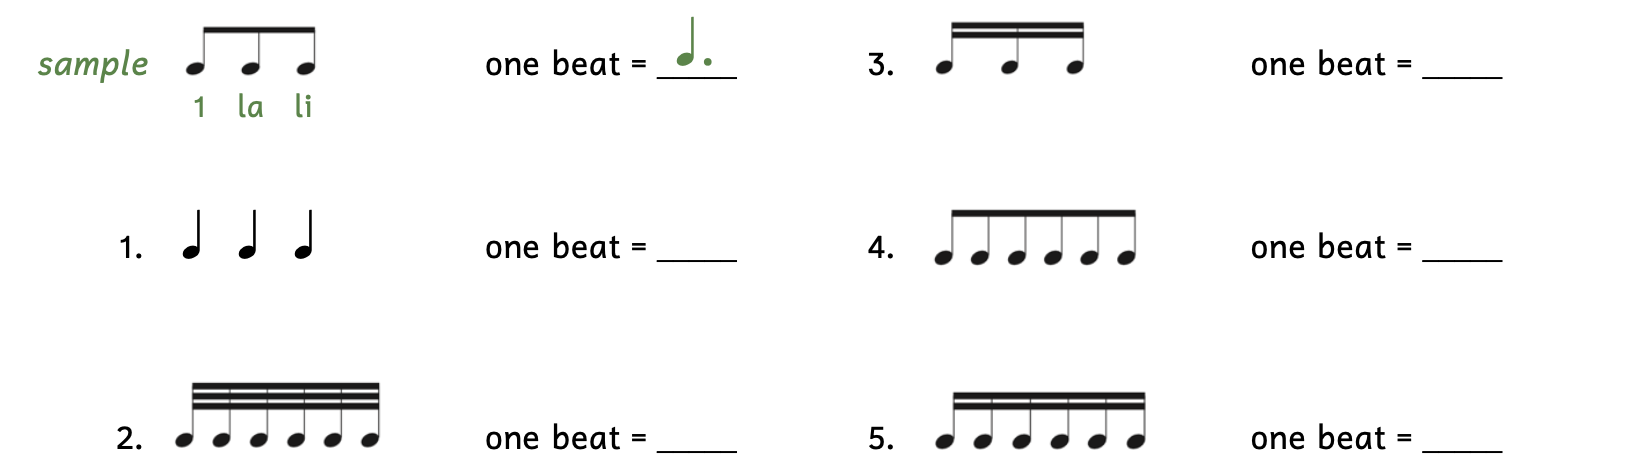
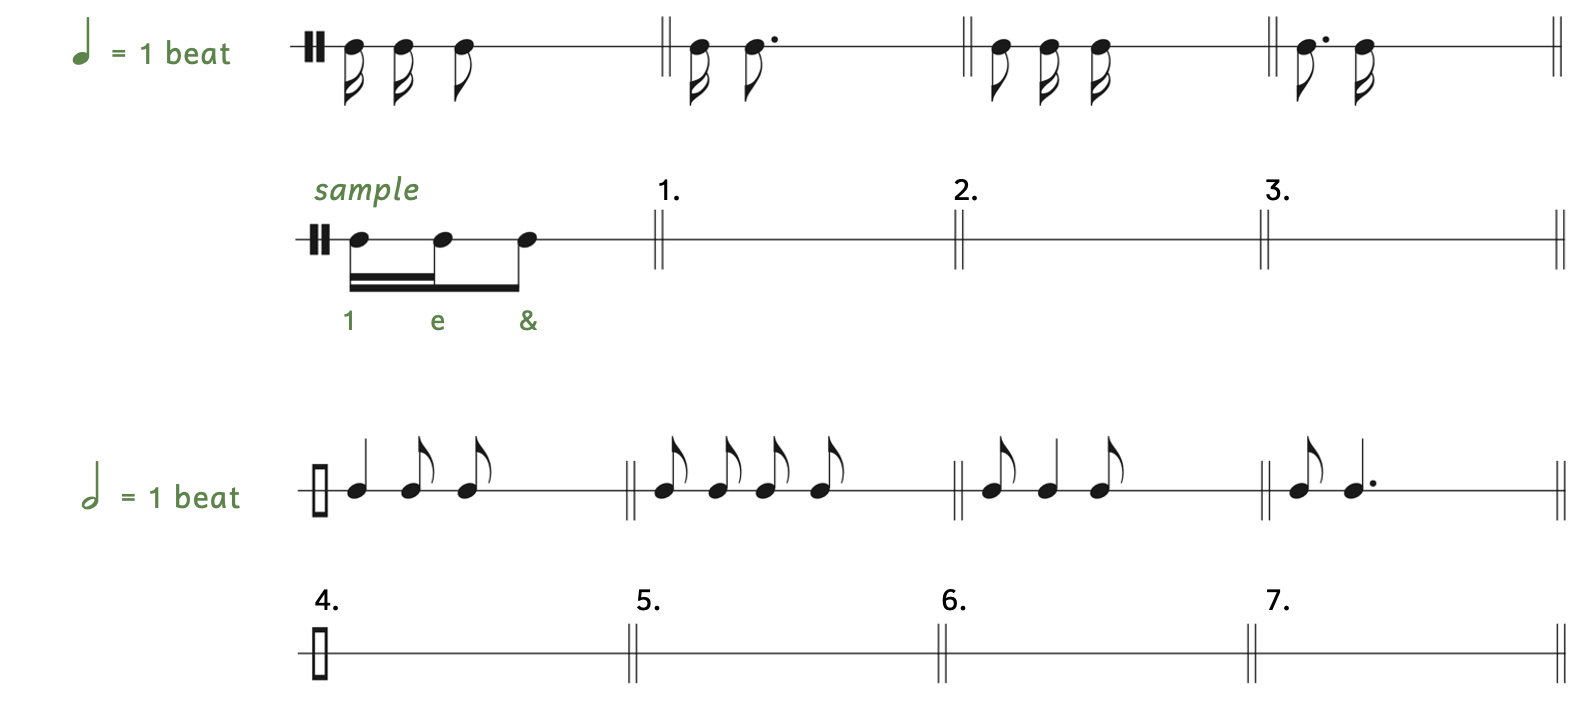
Practice 2.6A
Directions:
- Add rhythm syllables below.
- Hint: If there are two notes, they are the division; if there are four notes, they are the subdivision.
- In the blank to the right, write the note that gets one beat.
- Hint: The beat is a single note.

Click here to watch the tutorial.
Solution
3) quarter note
4) quarter note
5) eighth note
Dotted Notes
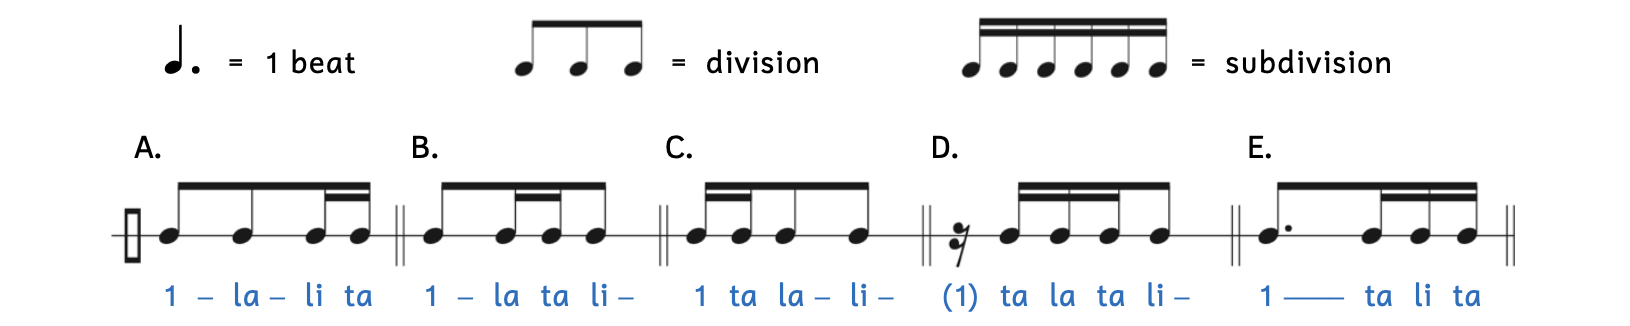
Dotted notes can also be equal to one, meaning that a dotted note can also be the beat. Because of the dot, which adds half the value of the note, dotted notes cannot be evenly divided into two. Instead, dotted notes are equally divided into three.
Example 2.6.6. Dotted notes

Just as some notes such as the half note, quarter note, and eighth note are most commonly used for the beat, there are dotted notes that are also more commonly used for the beat: the dotted half note, dotted quarter note, and dotted eighth note.
Notice that the eighth-note division and sixteenth-note division are beamed together as a group of three. Remember that whenever notes with flags fall within a beat, they are beamed together.
Each note of the division can be subdivided. Since the notes in the division do not have dots, the subdivision will divide notes evenly into two, not three. It is only when there is a dotted note that you must divide equally into three.
Example 2.6.7. Dotted notes subdivision
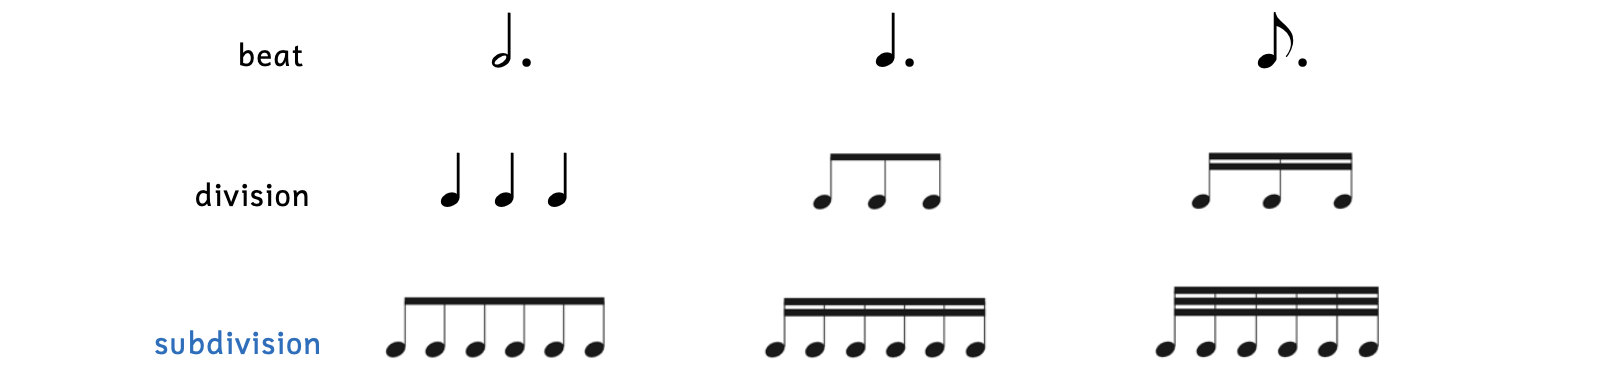
Look at the subdivision of the dotted eighth note beat. Imagine how hard it would be for a musician to see six individual thirty-second notes with flags! Since they are beamed together, musicians skim the group and immediately know this is the subdivision of a dotted note.
We use different rhythm syllables for the rhythm number system for dotted-note divisions and subdivisions.
Example 2.6.8. Dotted beat rhythm number system

- For now, we say “1” whenever there is a note that is worth one beat or when a note falls on the first part of the beat. (Later, we will use other numbers.)
- When a note falls on the first division, we say “la” (pronounced “lah”).
- When a note falls on the second division, we say “li” (pronounced “lee”).
- When a note falls on any of the weaker subdivisions (i.e., those subdivisions that are not also divisions), we say “ta” (pronounced “tah”).
Example 2.6.9 clearly shows the division and subdivision of the beat.
Example 2.6.9. Donizetti[7], “Una furtiva lagrima,” from L’Elisir d’amore, Act 2, Scene 3
In Example 2.6.9, a dotted quarter note receives the beat, the division is three eighth notes, and the subdivision is six sixteenth notes.
- For the division, there is one beam connecting three eighth notes because eighth notes have one flag.
- For the subdivision, two beams connect six sixteenth notes together to equal one beat because sixteenth notes have two flags
Dotted Beats
• Any dotted note value can be equal to one beat, but the dotted half note, dotted quarter note, and dotted eighth note are the most common.
• Dotted beats are equally divided into three, creating a division.
• Divisions can be evenly bisected into two, creating a subdivision. Therefore, dotted beats can be equally divided into a subdivision of six.
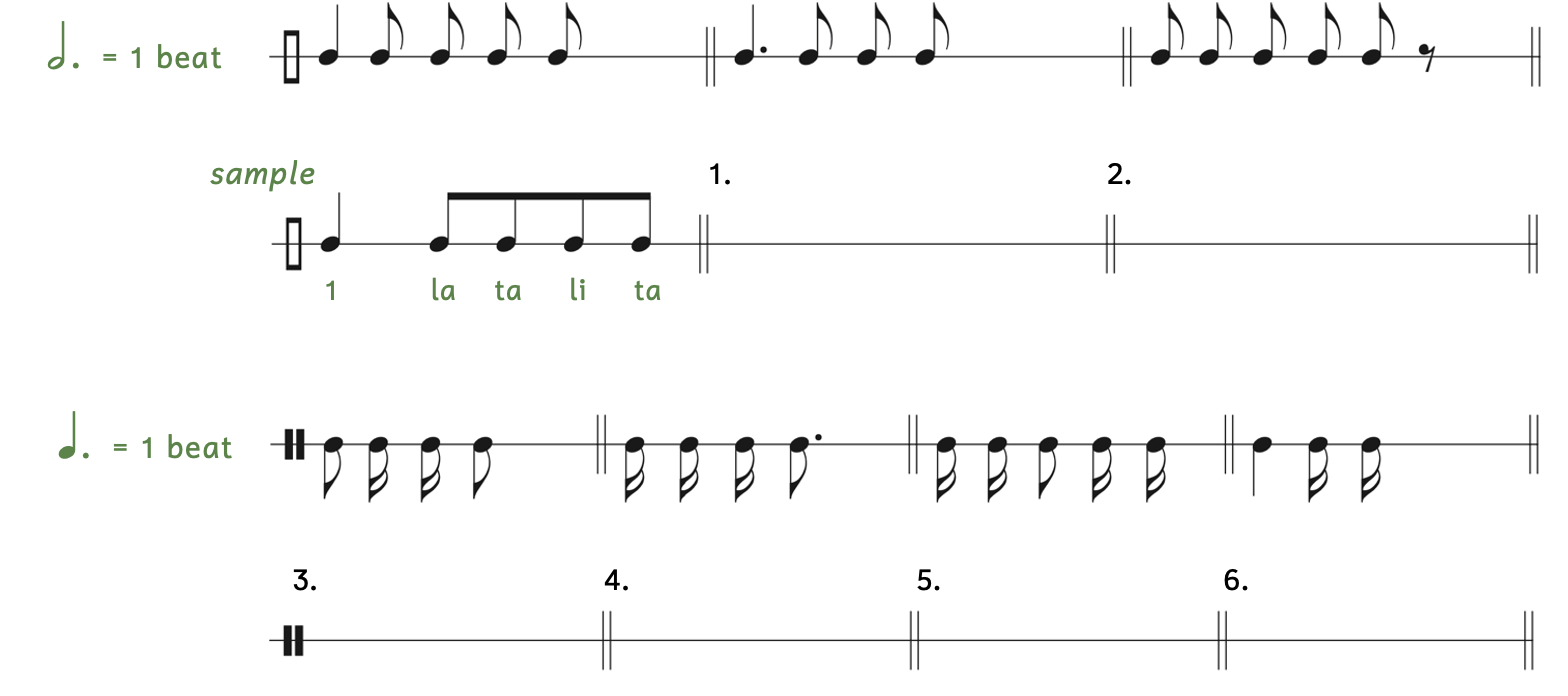
Practice 2.6B
Directions:
- Add rhythm syllables below.
- Hint: If there are three notes, they are the division; if there are six notes, they are the subdivision.
- In the blank to the right, write down the note that gets one beat.
- Hint: The beat is a single dotted note.
Click here to watch the tutorial.
Solution
2) dotted eighth note
3) dotted eighth note
4) dotted half note
5) dotted quarter note
As you can see, the divisions and subdivisions are quite different when a dotted note is the beat or when a note without a dot is the beat.
Example 2.6.10. Divisions and subdivisions

When performing beats, divisions, and subdivisions, not all notes are created equal.
- The sound that occurs on the beat itself (“1”) is the strongest, meaning that it has more emphasis than the notes in the division or the subdivision.
- The next strongest notes are those that fall on the division.
- The other notes that only occur on the subdivisions are to have no emphasis placed on them.
We can illustrate the weight of each note by using articulation marks.
Example 2.6.11. Subdivision weighted notes[8]

- Example 2.6.11A:
- The note that falls on the first part of the beat (1) has the strongest accent.
- The next strongest accent falls on the division (&).
- The two remaining notes of the subdivision have no accent.
- Example 2.6.11B:
- The note that falls on the first part of the beat (1) has the strongest accent.
- The next strongest accents fall on the divisions (la and li).
- The three remaining notes of the subdivision have no accent.
Practice 2.6C
Directions:
- Fill in the table using the correct note(s). Be sure to beam notes that require beaming.
Click here to watch the tutorial.
BEAMING 2.7
As long as the summation of note values equals one beat, we can combine any combination of notes to equal one beat.
Example 2.7.1. Combinations
Notice the clef used in Example 2.7.1. It is called a neutral clef or percussion clef. The neutral clef means that there are no pitches. It is often used with a single-line staff, as opposed to the five-line staff we use for pitches. There is another way to draw the percussion clef, which is shown in Example 2.7.2.
Beaming is sometimes difficult for students, so we will break down each example above.
- Example 2.7.1A: Combining an eighth note (one flag) with two sixteenth notes (two flags) results in one long beam connecting all the notes (because they have at least one flag) and a second beam connecting only the two sixteenth notes (because only they have two flags).
- A dash indicates that the rhythm syllable is to be held out.
- Example 2.7.1B: Same idea as Example 2.7.1A, but the sixteenth notes occur first.
- Example 2.7.1C: Sixteenth notes are on both ends and the eighth note is in the middle.
- One beam connects all three notes because all three notes have at least one flag.
- Because the sixteenth notes are not paired with another sixteenth note, their second flag cannot be beamed. The second sixteenth flag is represented by a shortened beam, which points inward.
- Example 2.7.1D: A dotted eighth note, which is equal to three sixteenth notes, is paired with a sixteenth note to complete the beat.
- Both the dotted eighth note and the sixteenth note have at least one flag, so one beam connects the notes.
- The sixteenth note has two flags but is not paired with another sixteenth note. Its second sixteenth flag is represented by a shortened beam, which points inward.
- Example 2.7.1E: This is the opposite of Example 2.7.1D.
- Both the dotted eighth note and the sixteenth note have at least one flag, so one beam connects the notes.
- The sixteenth note has two flags but is not paired with another sixteenth note. Its second sixteenth flag is represented by a shortened beam, which points inward.
- The dot is placed to the right of the note because dots are always to the right of the note: they cannot be to the left of the note.
Rests can substitute for notes for any of the examples in Example 2.7.1. As long as the summation of the note values equals one, you can simply substitute any note for a rest.
Example 2.7.2. Notes and rests

The clef used in Example 2.7.2 is another way to write the neutral clef, or percussion clef.
Notice that some of the rhythm syllables are in parentheses. They are in parentheses because you do not speak the rhythm syllable when there is a rest. They are merely written in as place holders.
- Example 2.7.2A: Changing the first sixteenth note to a sixteenth rest results in the last sixteenth note without another sixteenth note to pair with it. Instead, the last sixteenth note has a shortened beam.
- Notice how the beam still continues over the rest because these notes are occurring within one beat.
- Example 2.7.2B: Changing the eighth note to an eighth rest results in only the two sixteenth notes beamed together. Be careful to not assume the two sixteenth notes are the division because it is a group of two.
- Example 2.7.2C: Changing the first sixteenth note to a sixteenth rest results in a rest at the start of the beat.
- Example 2.7.2D: Changing the last sixteenth note to a sixteenth rest results in a free-standing dotted eighth note with a flag. There is no beam because the flag has nothing to pair with it.
- Example 2.7.2E: Changing the last dotted eighth note to a dotted eighth rest also results in a free-standing note. This time the sixteenth note has two flags because the flags have nothing to pair with it.
- Examples 2.7.2D and E use the same rhythm syllable (“1”), but you would hold out Example 2.7.2D a little longer.
Scott Joplin’s familiar melody from “The Entertainer” uses a variety of subdivision groupings (Example 2.7.3). He combines eighth notes and sixteenth notes in three different ways, and also uses the basic subdivision of four sixteenth notes, the beat of the quarter note, and two beats of the half note. Ignore the ties (small curved lines) in this example.
Example 2.7.3. Joplin[9], “The Entertainer”

Notice how the notes are spaced out in Example 2.7.3. There is more space after an eighth note and even more space after a quarter note. In addition, sixteenth notes are evenly spaced apart. It is important that you write rhythm visually as it occurs aurally.
Examples 2.7.4A and B are correctly written, while Examples 2.7.4C and D are not.
Example 2.7.4. Writing rhythm

- Example 2.7.4C: By writing the sixteenth note so close to the dotted eighth note, it gives the appearance that the dotted eighth note is as short as a sixteenth note. In reality, the dotted eighth note is three times longer than a sixteenth note and the sixteenth note should be placed at the end of the measure (as in Example 2.7.4A).
- Example 2.7.4D: By writing the dotted eighth note so far from the sixteenth note, it gives the appearance that the sixteenth note is very long. In reality, the sixteenth note is extremely short and the dotted eighth note should be written right next to it to appear as it sounds (as in Example 2.7.4B).
Practice 2.7A
Directions:
- Write the rhythm syllables below the example. See Example 2.7.3 for a sample. Ignore the tie (small curved line) for this example.
Joplin, “Maple Leaf Rag”

Click here to watch the tutorial.
Practice 2.7B
Directions:
- Based on the given note that equals one beat, beam the following groups of notes correctly. Each measure equals one beat.
- Write the stems in the same direction as the given rhythm.
- Be sure the rhythm is spaced out correctly so that it matches aurally and visually.
- Beneath your answer, write in the rhythm syllables.
Click here to watch the tutorial.
Dotted-Note Beats
The same rules apply when you write rhythms in which a dotted note is equal to one beat.
- Beam all flagged notes together when they fall within one beat.
- Space out notes visually as they occur aurally.
Example 2.7.5. Combinations with a dotted beat
The rhythm syllable for “1” in Example 2.7.5D is in parentheses. Since this measure begins with a rest, you do not say “one.”
Antonio Vivaldi uses a combination of divisions and subdivisions in the third movement of Spring from his Four Seasons.
Example 2.7.6. Vivaldi[10], “Spring” from The Four Seasons, iii


The dotted quarter note equals one beat in Example 2.7.6.
- Example 2.7.6A: Vivaldi uses the basic beat (dotted quarter note) once and different combinations of the division and subdivision.
- Example 2.7.6B: The basic division of three eighth notes occurs twice in addition to different combinations of the division and subdivision.
In Example 2.7.6, notice how longer note values have more space after them, while sixteenth notes are evenly space apart by the smallest distance.
Beaming
• When notes with flags fill a beat, the flags merge together as beams.
• Be sure to space out the notes as they sound.
Practice 2.7C
Directions:
- Write the rhythm syllables below the example. See Example 2.7.6 for a sample. Ignore ties (small curved lines) for this example.
Vivaldi, “Spring” from The Four Seasons, iii

Click here to watch the tutorial.
Practice 2.7D
Directions:
- Based on the given note that equals one beat, beam the following groups of notes correctly. Each measure equals one beat.
- Write the stems in the same direction as the given rhythm.
- Be sure the rhythm is spaced correctly so that it matches aurally and visually.
- Beneath your answer, write in the rhythm syllables.
Click here to watch the tutorial.
C CLEFS 2.8
We already learned about the two most common clefs for pitches: the treble clef and the bass clef. There are also other types of clefs called moveable C clefs. They are so named for the following reasons:
- They are moveable because there are five different types that are located on different parts of the staff.
- They are called C clefs because the center of the clef is placed where middle C is.
Example 2.8.1 shows one type of C clef.
Example 2.8.1. One type of C clef

The C clef in Example 2.8.1 is the most commonly-used C clef called the alto clef. You should be familiar with the alto clef, as it is the third most common clef (after treble clef and bass clef). Since you know where middle C is, simply count up or down to locate other pitches.
Example 2.8.2. Pitches in the alto clef

There are some shortcuts you can use when first learning the alto clef:
- If your primary clef is the treble clef, the alto clef appears to be a diatonic whole step above treble clef.[11]
- For example, the first note in Example 2.8.2 would be C in treble clef, but is D in alto clef.
- If your primary clef is the bass clef, the alto clef appears to be a diatonic whole step below bass clef.[12]
- For example, the first note in Example 2.8.2 would be E in bass clef, but is D in alto clef.
The viola usually uses the alto clef, but also uses treble clef. Example 2.8.3 is an excerpt from a common chamber ensemble called a string quartet, which includes two violins, one viola, and a cello. The pitches for the viola are written below the viola’s part.
Example 2.8.3. Hensel[13], String Quartet in E-flat Major, H277, ii
- The two violins read in the treble clef.
- The viola’s part is in the alto clef.
- The cello’s part is in the bass clef.
As mentioned, the alto clef is one type of moveable C clef and moveable C clefs are so named because they move up and down the staff. There are four other types of moveable C clefs.
Example 2.8.4. Moveable C clefs

The notes in Example 2.8.4 are all middle C in the different moveable C clefs. The moveable C clefs share the names of vocal ranges. The treble clef and bass clef also have moveable versions, where G4 moves in the treble clef and F3 moves in the bass clef. However, those clefs are infrequently used.
- Example 2.8.4A: The soprano clef is the lowest-placed C clef. It is used for voices or instruments with the highest range because this allows for the highest-sounding pitches before using ledger lines.
- Example 2.8.4B: The mezzo-soprano clef places C4 on the second line.
- Example 2.8.4C: The alto clef is the most common C clef. The viola reads the alto clef most often.
- Example 2.8.4D: The tenor clef is the second most-common moveable C clef. It is sometimes used by instruments such as the bassoon and cello.
- Example 2.8.4E: The baritone clef is the highest-placed C clef. It is used for voices or instruments with the lowest range because this allows for the lowest-sounding pitches before using ledger lines.
Example 2.8.5 shows an excerpt in tenor clef, written for the bassoon. The pitches are written below the staff.
Example 2.8.5. Ravel[14], Bolero

The bassoon reads music in both bass clef and tenor clef. Tenor clef is used when the bassoon performs higher-sounding pitches. The first note in Example 2.8.5 is B-flat4. The bass clef would require four ledger lines. Although it may seem inconvenient to learn another clef, once you are fluent in the clef, it is much easier to read than trying to quickly interpret multiple ledger lines.
There are only five different moveable C clefs because there are five lines on the staff. The moveable C clefs do not extend beyond the staff. Observe what happens if we extend the placement of C4 outside the staff with ledger lines.
Example 2.8.6. Beyond the C clefs

The reason why we do not have a moveable C clef below or above the range of the staff is because those are already represented by the treble clef and bass clef.
Moveable C Clefs
• In addition to the treble clef and bass clef, there are also moveable C clefs.
• The center of a moveable C clef points at middle C (C4).
• Although there are five different types of C clefs, only the alto clef and tenor clef are commonly used.
Practice 2.8A
Directions:
- Identify the pitches on the staff using octave designations.

Click here to watch the tutorial.
Solution
Practice 2.8B
Directions:
- Write the pitches on the staff using correct beaming based on the given rhythm. Assume a quarter note equals one beat.

Click here to watch the tutorial.
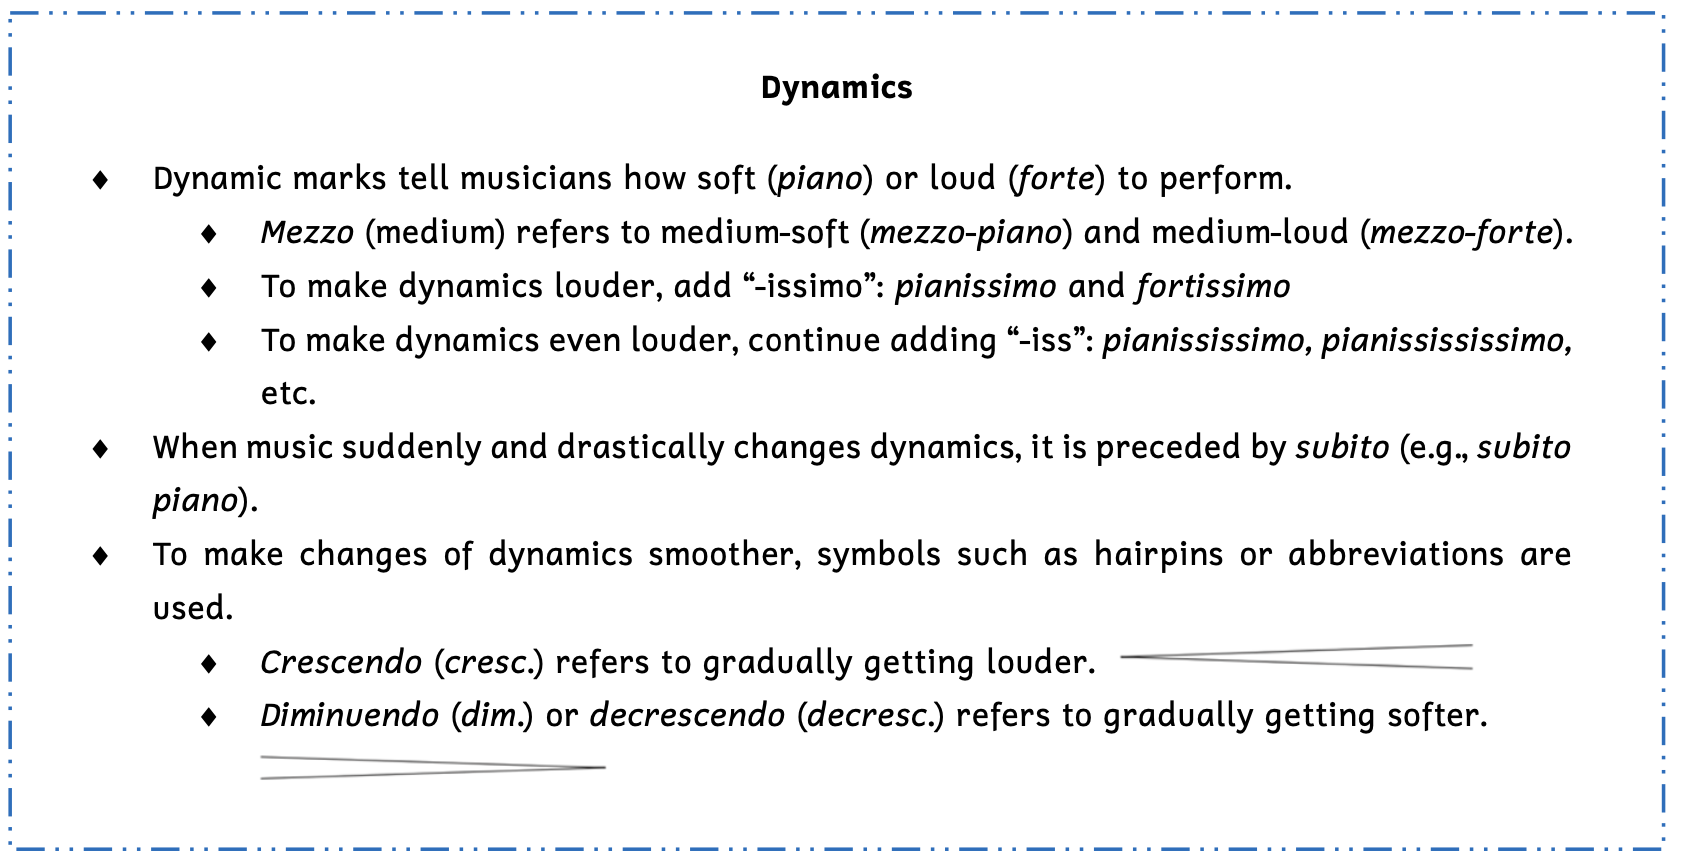
DYNAMICS 2.9
In Chapter 1, we learned about articulation marks: symbols that tell musicians how to perform specific notes. In this section, we learn about dynamics: symbols that tell musicians at what volume (how soft or how loud) to perform specific sections. The symbols are abbreviations of Italian words based on piano (soft) and forte (loud).
Example 2.9.1. Dynamics

The spectrum above shows various dynamics from the softest to the loudest. Notice that both piano and forte add -issimo to mean more softly or more loudly; adding -ississimo means even more softly or loudly. There are even softer and louder dynamics (e.g., fortissississimo (ffff)), but they are not as common.
Because dynamics are relative, hearing the difference between mezzo-piano (mezzo meaning “half” or “middle” in Italian) and mezzo-forte can be difficult. However, the difference between piano and forte should be obvious.
Example 2.9.2 is the familiar children’s song “Twinkle, Twinkle, Little Star” with added dynamics.
Example 2.9.2. Applied dynamics, “Twinkle, Twinkle, Little Star”

This example concludes with a final double bar line because it is the end of the song. Notice that the second line is thicker than the first, differentiating it from the other double bar lines we have been using.
Using the terms we learned, we can write sentences about the dynamics in Example 2.9.2:
- Example 2.9.2 begins pianissimo at measure 9 and becomes mezzo-piano at the middle of measure 10. The melody suddenly changes to forte for two bars (measures 11-12) until the final note, which is piano.
Based on the given dynamics, each change of dynamics would occur suddenly, or subito. For example, measures 11-12 would be forte until the final note, which is subito piano (suddenly soft). The effect of subito piano has its own dynamics symbol: fp (abbreviation for forte-piano) or sfp (abbreviation for subito forte-piano).
The Overture (or opening) of Mozart’s opera The Magic Flute contains a variety of starkly contrasting dynamics, including piano, forte, and subito forte-piano (Example 2.9.3).
Example 2.9.3. Contrasting dynamics: Mozart[15], The Magic Flute, Overture
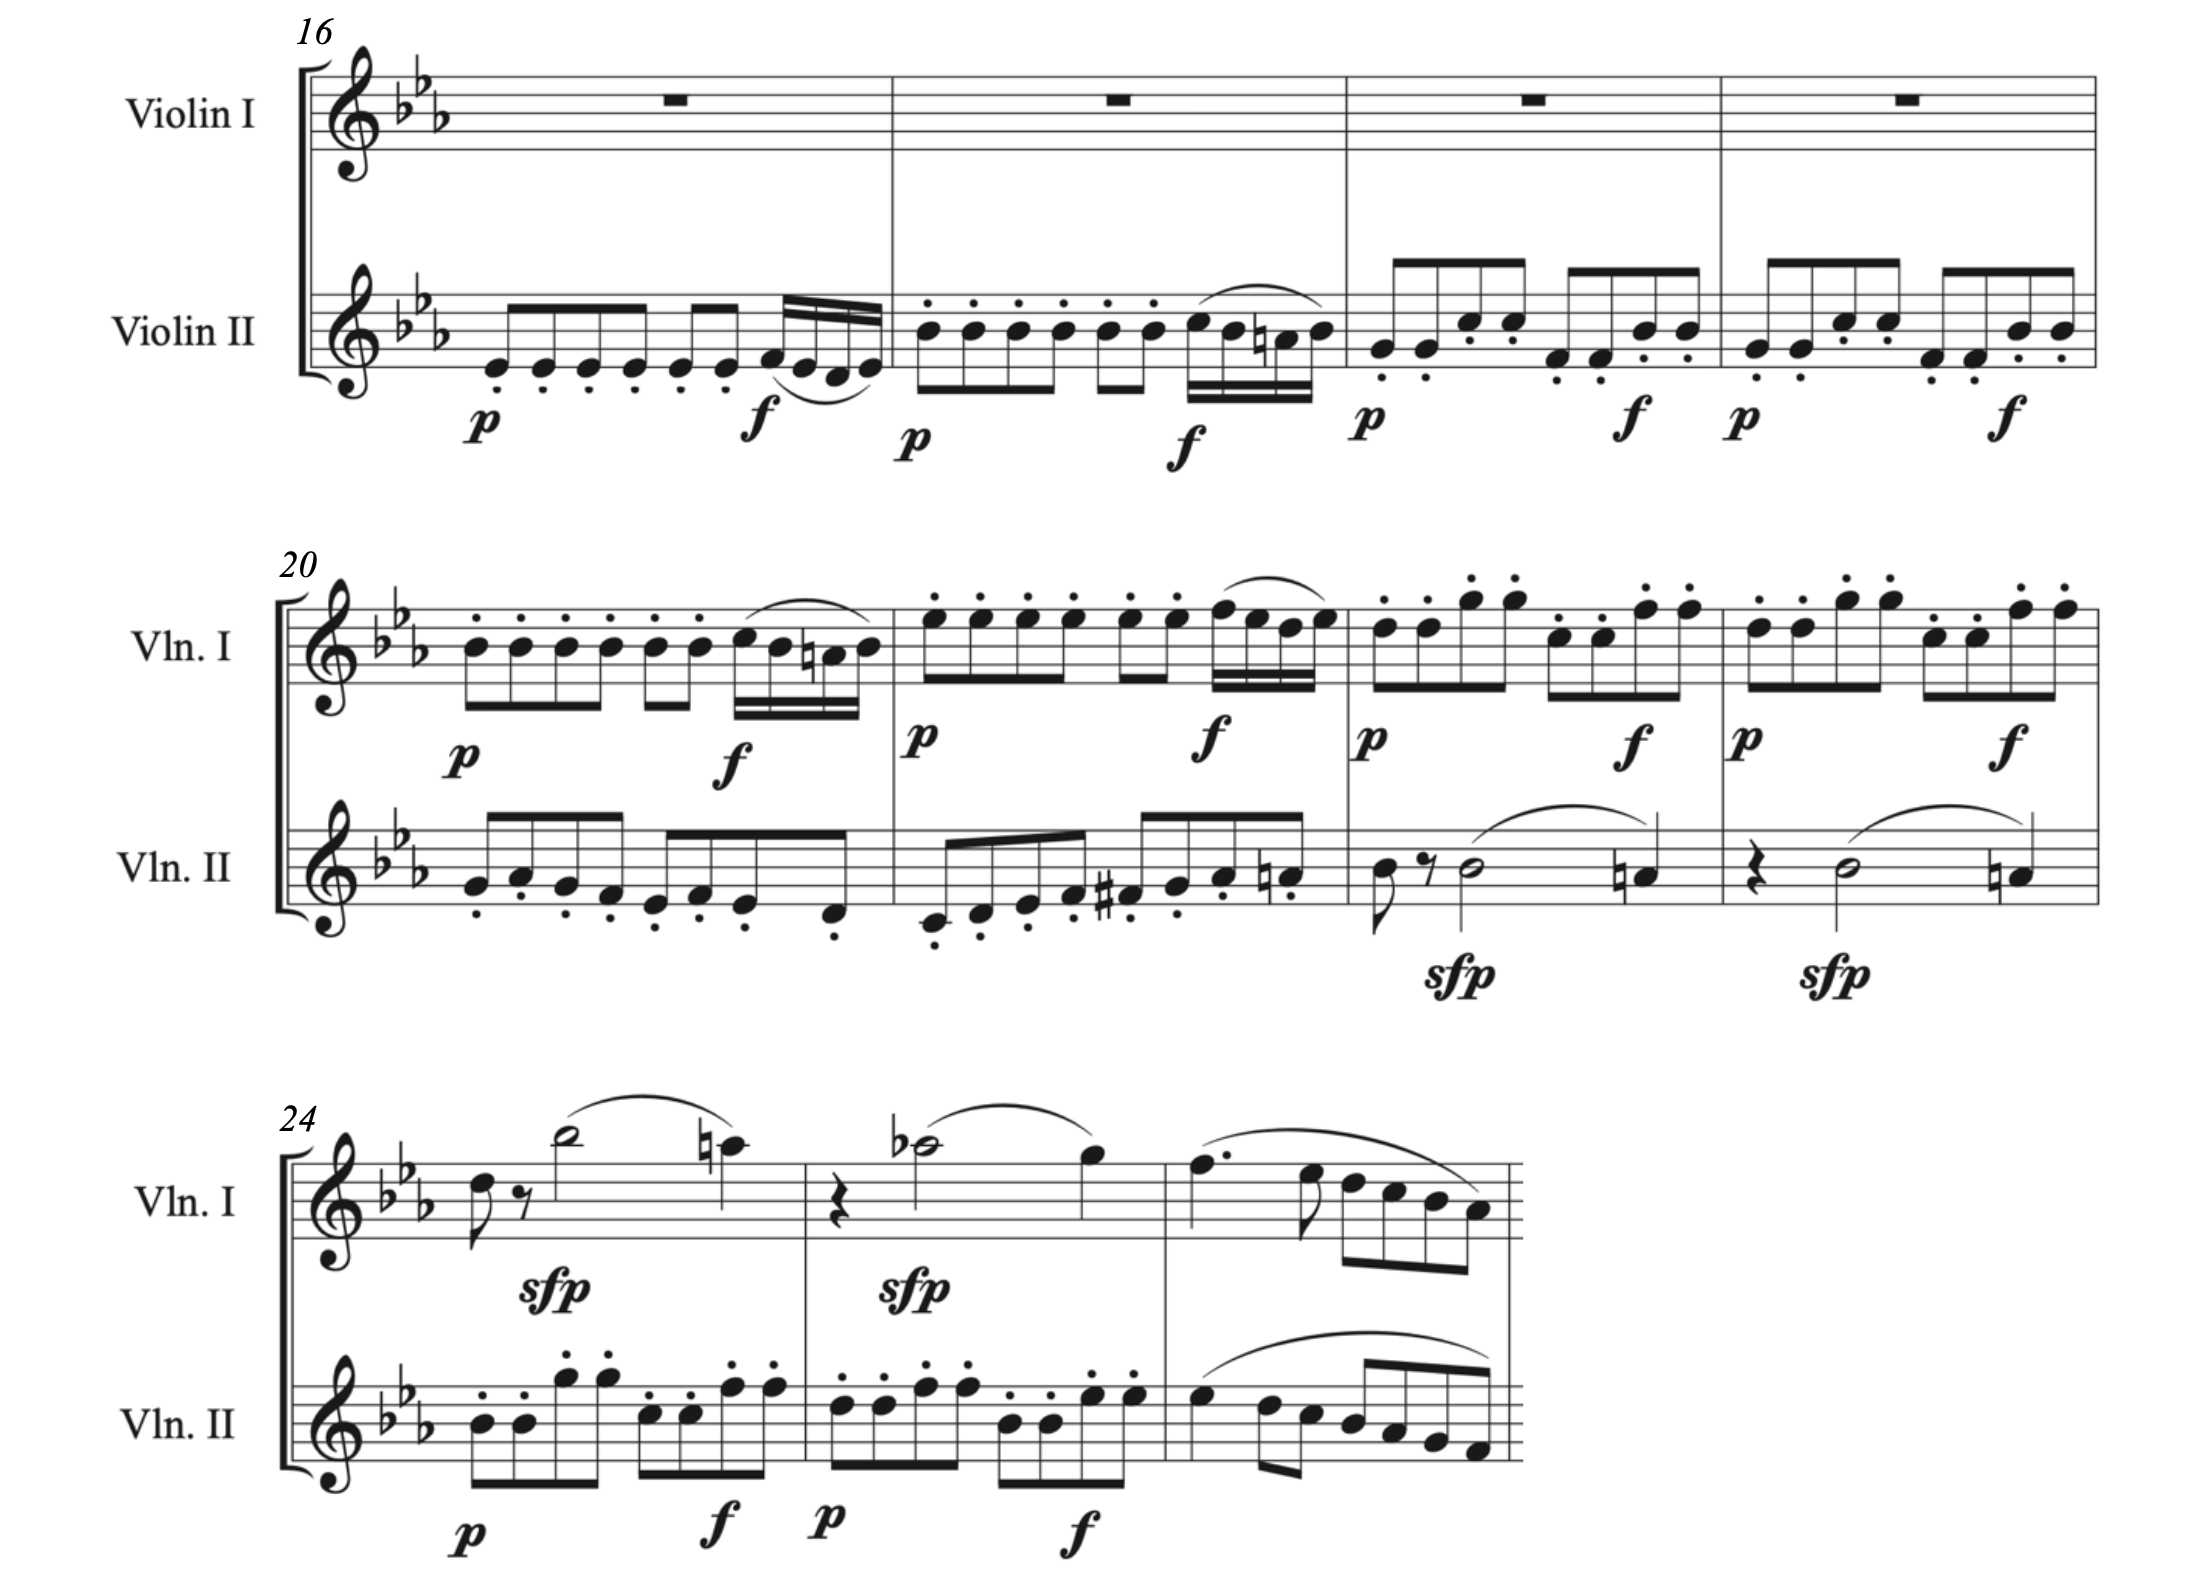
- The second violins’ eighth notes begin piano until sixteenth notes marked forte suddenly appear.
- The pattern of piano and forte continues as the first violins join in.
- To emphasize the severe contrast of dynamics, Mozart writes subito forte-piano for the half notes.
- These half notes should be suddenly forte at the point of attack, but then immediately drop to piano. The entire duration of the half note should not be forte.
Although Mozart wanted sudden changes of dynamics, sometimes it can sound a bit harsh and not very musical (as in Example 2.9.2). In order to transition smoothly from one dynamic to another, we have terms and symbols that tell us to gradually get softer or gradually get louder (Example 2.9.4).
Example 2.9.4. Gradual dynamics, “Twinkle, Twinkle, Little Star”

- Crescendo means that the music grows louder. There are two ways to represent crescendo.
- Hairpins (stretched-out “less than” symbol) visually represent the increase of volume (measures 9-10).
- The abbreviation “cresc.” can also be used.
- Diminuendo or decrescendo means that the music grows softer. There are three ways to represent the decrease of volume.
- Hairpins (stretched-out “greater than” symbol) visually represent softening of sound (measures 11-12).
- The abbreviation “dim.” can be used.
- The abbreviation “decresc.” can also be used.
Oftentimes, other words are paired with these gradual dynamics symbols to emphasize how it should be performed:
-
-
- Molto (“much”) is used when a great change of volume is desired (e.g., molto cresc.).
- Poco (“little”) is used when a subtle change of volume is desired (e.g., poco decresc.).
- Poco a poco (“little by little”) is used when a subtle change of volume is desired a little at a time (e.g., poco a poco dim.).
-
Example 2.9.5. More specific gradual dynamics, “Twinkle, Twinkle, Little Star”

The specific gradual dynamics in Example 2.9.5 tell us more about how to perform the excerpt.
- The music begins very softly (pianissimo) and gets much louder (molto cresc.) starting at measure 10, ending at a medium-soft (mezzo-piano) level.
- Measure 11 begins loudly (forte) and gets softer little by little (dim. poco a poco) until concluding softly (piano).
Example 2.9.6. shows a famous example of a powerful crescendo.
Ex. 2.9.6. Powerful crescendo: Beethoven, Symphony No. 5 in C Minor, Op. 67, iii to iv
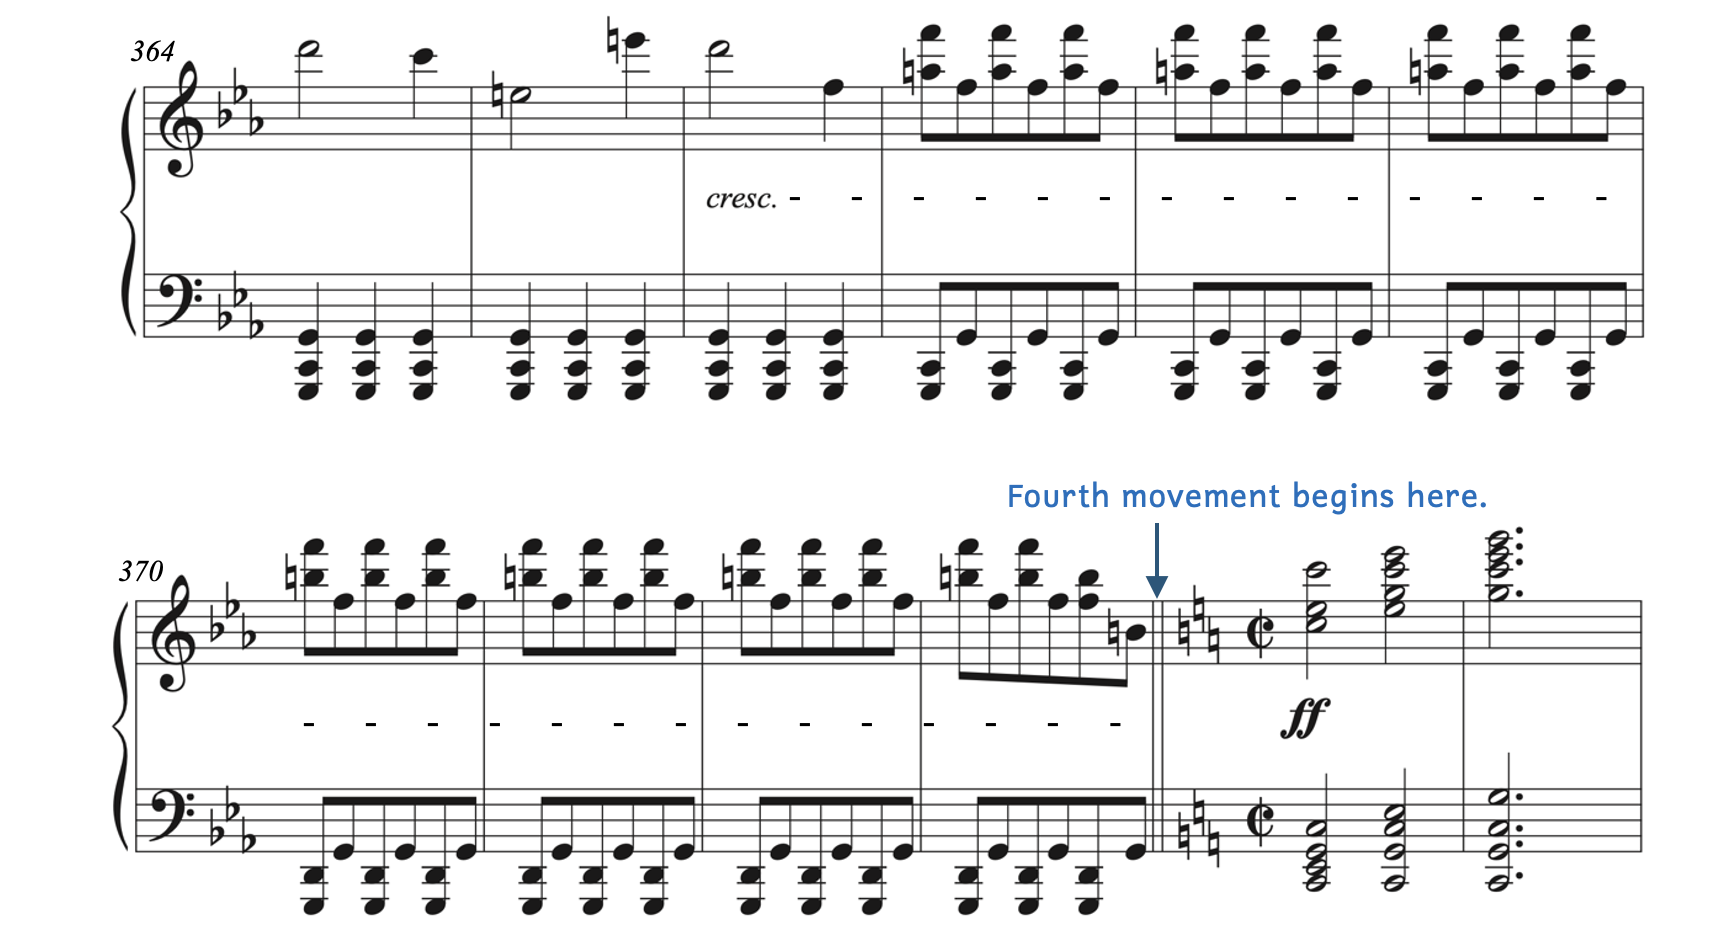
Example 2.9.6 shows the end of the third movement and the start of the fourth movement of Beethoven’s Fifth Symphony. Movements are like chapters in books; usually there is a clear demarcation between chapters and movements. However, in Beethoven’s Fifth Symphony, the third movement smoothly blends into the fourth movement without a break. Before Example 2.9.5 begins, the music is pianissimo and begins to crescendo at measure 366. The music gradually crescendos until it reaches an explosive fortissimo at the start of the fourth movement. Be sure to listen to a recording.
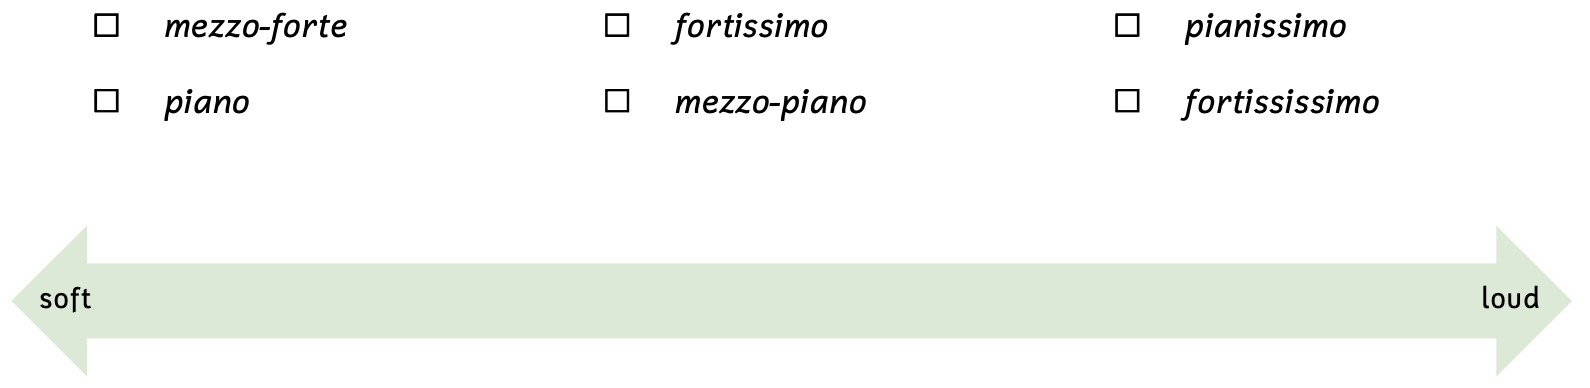
Practice 2.9A
Directions:
- Arrange the following dynamics from softest to loudest by writing their abbreviation onto the spectrum arrow below.
Click here to watch the tutorial.
Solution
Practice 2.9B
Directions:
- Based on the example below, answer the following questions. The flat immediately following the treble clef and bass clef is called a key signature, which we will learn about in Chapter 4. Ignore it for now.
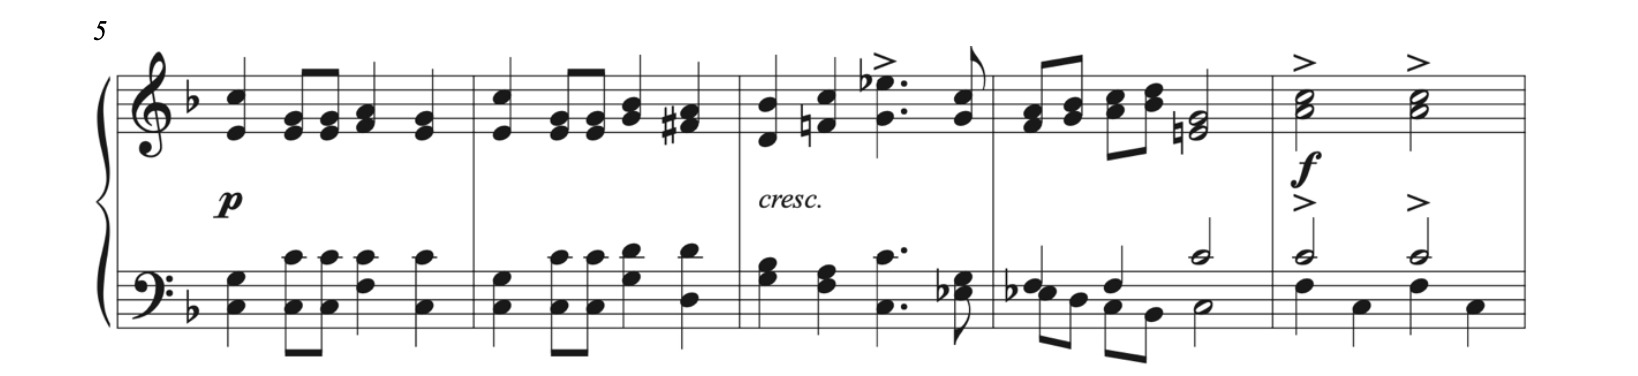
- Does this example start at the beginning of the piece? If not, where does it begin?
- Based on the beaming, what note is worth one beat?
- In measure 7, why is there a natural sign on F4?
- In measure 7, why aren’t the dotted quarter note and eighth note beamed together?
- In measure 8, why is there a flat on E-flat3?
- In measure 8, why is there a natural sign on E4?
- Are the symbols above the treble clef in measure 9 diminuendo markings? If not, what are they?
- Is this the end of the piece? If not, why not?
- In 2-4 complete sentences, describe the dynamics in this example.
Smyth[16], The March of the Women
SUMMARY
-
-
- It is important to always be aware of where the two white-key half steps are on the keyboard: between B and C, and between E and F. [2.1]
- Accidentals are symbols that tell you how to raise or lower a note, or if it should return back to its white key. [2.2]
- Sharp: raise a white key by a half step
- Flat: lower a white key by a half step
- Double sharp: raise a white key by a whole step
- Double flat: lower a white key by a half step
- Natural: return a note to its white key
- Accidentals are localized, meaning that they only apply to that specific octave designation and they no longer apply after a bar line. [2.2]
- Enharmonic equivalents are notes that are spelled differently, but are the same key on the keyboard (or sound the same). [2.3]
- Chromatic steps share the same letter name (e.g., G and G-sharp), whereas diatonic steps do not (e.g., G and A-flat). [2.4]
- A scale is a collection of ascending or descending pitches that begin and end with the same note an octave apart. [2.5]
- Using only half steps, a chromatic scale uses all 12 pitches. [2.5]
- While ascending, sharps are used for the black keys.
- While descending, flats are used for the black keys.
- Any note value can be equal to one, which means any note can be the beat. The most common note values for one beat are a half note, a quarter note, and an eighth note. [2.6]
- Beats are evenly bisected into two, forming a division.
- Divisions are evenly bisected into two, forming a subdivision. As a result, beats are evenly divided into four subdivisions.
- Any dotted note value can equal to one, which means any dotted note can be the beat. The most common dotted note values for one beat are a dotted half note, a dotted quarter note, and a dotted eighth note. [2.6]
- Dotted beats are equally divided into three, forming a division.
- Divisions are evenly bisected into two, forming a subdivision. As a result, dotted beats are equally divided into six subdivisions.
- To organize divisions and subdivisions so that musicians can read them easily, we group them with beams. [2.7]
- In addition to the treble clef and bass clef, there are also five moveable C clefs. [2.8]
- The middle of the C clef points to C4.
- The most common moveable C clef is the alto clef, followed by the tenor clef.
- Dynamics are symbols or abbreviations that tell musicians how soft (piano) or how loud (forte) to perform. [2.9]
-
TERMS
-
-
- accidentals
- beam/beaming
- beat
- C clef
- soprano clef
- mezzo-soprano clef
- alto clef
- tenor clef
- baritone clef
- chromatic half/whole step
- chromatic scale
- courtesy accidental (cautionary accidental)
- crescendo
- decrescendo
- diatonic half step/whole step
- diminuendo
- division (beat division)
- dotted beat
- dynamics
- pianississimo
- pianissimo
- piano
- mezzo-piano
- mezzo-forte
- forte
- fortissimo
- fortississimo
- enharmonic equivalents
- final double bar line
- half step
- measure number (or bar number)
- molto
- neutral clef
- percussion clef
- poco
- poco a poco
- rhythm syllable
- rhythm number system
- scale
- subdivision (beat subdivision)
- subito
- whole step
-
- Julie Candeille (1767-1834) was a French composer. ↵
- Luise Adolpha Le Beau (1850-1927) was a German composer. ↵
- Maria Szymanowska (1789-1831) was a Polish composer. ↵
- Georges Bizet (1838-1875) was a French composer. ↵
- Julius Fučik (1872-1916) was a Czech composer also known as the "Bohemian Sousa." ↵
- This example has been rewritten in C major. ↵
- Gaetano Donizetti (1797-1848) was an Italian composer ↵
- The clef used in this example is called a neutral clef, which will be explained in the next section. ↵
- Scott Joplin (1868-1917) was an American composer and pianist known as the "King of Ragtime." ↵
- Antonio Vivaldi (1678-1741) was an Italian composer. ↵
- The alto clef is actually a seventh below the treble clef, but for naming pitches, using a whole step above is quicker. ↵
- The alto clef is actually a seventh above the bass clef, but for naming pitches, using a whole step below is quicker. ↵
- Fanny Mendelssohn Hensel (1805-1847) was a German composer and pianist. Her brother is also a composer (Felix Mendelssohn). ↵
- Maurice Ravel (1875-1937) was a French composer. ↵
- Wolfgang Amadeus Mozart (1756-1791) was an Austrian composer. ↵
- Ethel Smyth (1858-1944) was an English composer. ↵
Smallest distance between keys on a keyboard.
Two half steps
Musical symbol that tells you to lower or raise a note a half step or a whole step.
Musical symbol that indicates a note is a whole step lower than the white key.
Musical symbol that indicates a note is a half step lower than the white key.
Musical symbol that indicates that a previous accidental no longer applies and continues back to the white key.
Musical symbol that indicates a note is a half step higher than the white key.
Musical symbol that indicates a note is a whole step higher than the white key.
Accidental that is not necessary, but is added to clear any confusion. Also known as a cautionary accidental.
Accidental that is not necessary, but is added to clear any confusion. Also known as a courtesy accidental.
Two notes that are the same key on the keyboard (or sound the same), but have different note names (i.e., are spelled differently).
Half steps that have the same note name (e.g., F and F-sharp).
Half steps that have different note names (e.g., F and G-flat).
Collection of pitches that ascends or descends in alphabetical order from one note to the same note an octave apart.
Scale made entirely of half steps.
The constant pulse you feel when you experience music.
When a beat is evenly divided into two; also known as beat division. OR when a dotted beat is equally divided into three.
Horizontal line used to connect flags together that fall within a beat.
Division of the beat division. For simple meters, the subdivision is four equal notes; for compound meters, the subdivision is six equal notes.
Specific type of rhythm system that uses numbers on each beat and syllables for other parts of the beat.
One of the clefs used for non-pitched music.
One of the clefs used for non-pitched music.
Moveable clef that points at middle C.
Most common moveable C clef; used most often by the viola.
Symbols that tell musicians at what volume (how soft or how loud) to perform specific sections.
Double bar line that indicates the end of a piece or major section.
suddenly
suddenly soft
Music grows louder.
Music grows softer.
Music grows softer.
Much
Little
Little by little
Moveable clef that points at middle C.
Whole steps that have the same note name (e.g., F and F-double-sharp).
Whole steps that have different note names (e.g., F and G).
Numbering system for measures.
Syllables or numbers used for every sounded note to sound rhythm aloud.
